Enable Null Support
Last updated on
ColdFusion System Probes HAS BEEN DEPRECATED
For a full list of deprecated features, refer to Deprecated features.
Use the Adobe ColdFusion Administrator to perform basic administration tasks. You can also use the Administrator Application Programming Interface (API) to perform Administrator functionality programmatically.
Initial administration tasks
Immediately after you install ColdFusion, you might have to perform some or all the administrative tasks described in the following table:
Task |
Description |
|---|---|
Establish database connections |
ColdFusion applications require data source connections to query and write to databases. To create, verify, edit, and delete database connections, use the Data Sources page. For more information, see Data Source Management for ColdFusion. |
Specify directory mappings |
Directory mappings redirect relative file paths to physical directories on your server. To specify server-wide directory aliases, use the Mappings page. For more information, see Mappings page. |
Configure debugging settings |
Debugging information provides important data about CFML page processing. To choose the debugging information to display, and to designate an IP address to receive debugging information, use the Debugging & Logging section.For more information, see Debugging Output Settings page. |
Set up e-mail |
E-mail lets ColdFusion applications send automated e-mail messages. To configure an e-mail server and mail options, use the Mail Server page.For more information, see Mail page. |
Change passwords |
You might have to change the passwords that you set for the ColdFusion Administrator and Remote Development Service (RDS) during ColdFusion installation. To change passwords, use the Security section.For more information, see Administrator page and RDS page. |
Define user-specific access to the ColdFusion Administrator |
To grant user-specific access to the ColdFusion Administrator, you create users and specify a user name, password, applicable sandboxes, and the sections of the ColdFusion Administrator that each user can access. For more information, see Security section. |
Configure Java settings |
(Server configuration only) You might have to customize Java settings, such as classpath information, to meet the needs of your applications. To change Java settings, use the Java and JVM page.For more information, see Extensions section. |
Restrict tag access |
Some CFML tags might present a potential security risk for your server. To disable certain tags, use the Sandbox Security page.For more information, see Administering ColdFusion Security. |
Access online help
You can use the buttons on the upper left of the ColdFusion Administrator to access online Help, information about additional resources, and system information.
- Online Help Click the question-mark icon on any ColdFusion Administrator page to access the context-sensitive online Help. The online Help has procedural and brief overview content for the ColdFusion Administrator page that you are viewing. This information appears in a new browser window and contains standard Contents, Index, and Search tabs.
- System Information Click System Information to see information about the ColdFusion server, including version number, serial number, and JVM details.
Note: In the case of JEE deployments with JDK 17, if you click the System Information icon, an error message displays. To resolve this, add the following line in jvm.config.
--add-opens=java.base/java.net=ALL-UNNAMED --add-exports=java.desktop/sun.awt=ALL-UNNAMED
- Resources Click Resources to display the Resources page, which provides links to the following:
- Getting Started experience
- Example applications,
- Product Information
- Technical Support and Training,
- Additional Installers
- Product Updates
- Community Resources
- Security-related Information
Server Settings section
The Server Settings section lets you manage client and memory variables, mappings, charting, and archiving. It also allows you to configure e-mail and Java settings.
Settings page
The Settings page of the ColdFusion Administrator contains configuration options that you can set or enable to manage ColdFusion. These options can significantly affect server performance. The following table describes the options:
Option |
Description |
|||||
|---|---|---|---|---|---|---|
Timeout Requests After (Seconds) |
Prevents unusually lengthy requests from using up server resources. Enter a limit to the time that ColdFusion waits before terminating a request. Requests that take longer than the time-out period are terminated. |
|||||
Enable Per App Settings |
Lets developers programmatically define ColdFusion settings such as mappings and debugging per application. |
|||||
Use UUID For cftoken |
Specify whether to use a universally unique identifier (UUID), rather than a random number, for a cftoken . |
|||||
Enable HTTP Status Codes |
Configures ColdFusion to set a status code of 500 Internal Server Error for an unhandled error. Disable this option to configure ColdFusion to set a status code of 200 OK for everything, including unhandled errors. |
|||||
Enable Whitespace Management |
Compresses repeating sequences of spaces, tabs, and carriage returns and linefeeds. Compressing whitespace can significantly compact the output of a ColdFusion page. This option is enabled, by default. |
|||||
| Disable Access To Internal ColdFusion Java Components | Prevents CFML code from accessing and creating Java objects that are part of the internal ColdFusion implementation. This prevents a non-authenticated CFML template from reading or modifying administration and configuration information for this server. | |||||
Disable CFC Type Check |
Turns off verifying the CFC type when calling methods with CFCs as arguments. This option also disables verifying an object that implements the right interface. Enabling this option can improve the performance of your application. However enable it only on a production server. |
|||||
Disable Access To Internal ColdFusion Java Components |
Prevents CFML code from accessing and creating Java objects that are part of the internal ColdFusion implementation. This prevents a non-authenticated CFML template from reading or modifying administration and configuration information for this server. |
|||||
| Preserve Case for Struct Key for Serialization | Maintains and preserves the case in which keys of a struct have been defined. If not checked, keys will be converted to uppercase. Cases for struct keys were not preserved in the past versions of ColdFusion. The struct keys get converted to upper case automatically. For instance, consider the following code:
In ColdFusion 10 and earlier versions, the output generated by the above code will be:
For ColdFusion 11 and following, the output generated will be:
To enable case preservation of struct keys, change the setting in the ColdFusion Administrator, as discussed above.
To enable case preservation of struct keys at the application level, modify the application. cfc file by setting:
|
|||||
Prefix serialized JSON with |
Protects web services, which return JSON data from cross-site scripting attacks by prefixing serialized JSON strings with a custom prefix. |
|||||
Enable In-Memory File System |
Enables the in-memory virtual file system support. By default, this is enabled. |
|||||
Memory Limit for In-Memory Virtual File System |
Lets you specify the memory limit in Megabytes (MB) for in-memory virtual file system. |
|||||
Watch Configuration Files For Changes (Check Every nSeconds) |
Sets ColdFusion to monitor its configuration files and automatically reload them if they change. This action is required if you deploy ColdFusion in a WebSphere ND vertical cluster, because multiple instances of ColdFusion share the same configuration files. It is recommended that you do not enable this feature for most installations. |
|||||
Enable Global Script Protection |
Protects Form, URL, CGI, and Cookie scope variables from cross-site scripting attacks. Select this option if your application does not contain this type of protection logic. Enabling the global site protection replaces all the null bytes (%00) with an %20. This is to prevent Null Byte injection Attacks as part of the Protection. To disable this protection just for cookie scope the following workaround can be used.
|
|||||
Allow Extra Attributes in AttributeCollection |
Specify whether ColdFusion tags can pass non-standard attributes in the attributecollection structure. |
|||||
Clear temporary files created during CFaaS after |
Specify the time in minutes after which the temporary files created during CF as a Service(CFaaS) operation must be deleted. The default value is 30 minutes. |
|||||
ORM Search Index Directory |
Specify the index directory (the one in which all persistent entities, of an application's indexable data, are saved) either at the server-level or application-level. |
|||||
Default ScriptSrc Directory |
Specify the default path (relative to the web root) to the directory that contains the cfform.js file. Developers reference this file in the ScriptSrc attribute of the cfform tag. In a hosted environment, you might need to move the cfform.js file to a directory other than CFIDE . |
|||||
Google Map API Key |
Specify the Google Map API license key that you require to access Google Maps. |
|||||
Component with onServerStart() method |
Specify the absolute path to a CFC having onServerStart() method or specify a dot delimited CFC path under web root, like "a.b.server". By default, ColdFusion looks for server.cfc under web root. |
|||||
| Allowed file extensions for <cfinclude> tag (New in ColdFusion 11) | Specify the list of allowed file extensions (as a comma separated list) while using the <cfinclude> tag. Specifying a wildcard ('*') in the list makes any file included using the <cfinclude> tag to be compiled. If any other file included using the <cfinclude> tag is not found in this list, their content will be statically included. By default files with the extensions cfm and cfml always gets compiled irrespective of this setting. This value can be overridden at the application-level using the key compileExtForInclude in theApplication.cfc/Application. cfm file. | |||||
Application.cfc/Application. cfm lookup order |
Select the order in which ColdFusion searches for Application.cfm or Application.cfc if it is not found in the current project folder. You can set ColdFusion to search as follows:
|
|||||
Missing Template Handler |
Specify a page to execute when ColdFusion cannot find a requested page. This specification is relative to the web root.Note: If the user is running Microsoft Internet Explorer with "Show Friendly HTTP error messages" enabled, Internet Explorer displays this page only if it contains more than 512 bytes. |
|||||
Site-Wide Error Handler |
Specify a page to execute when ColdFusion encounters an error while processing a request. This specification is relative to the web root. When you define a site-wide error handler or missing template handler, ColdFusion does not log page-not-found errors and exceptions.Note: If the user is running Internet Explorer with Show Friendly HTTP Error Messages enabled, Internet Explorer only displays this page if it contains more than 512 bytes. |
|||||
Maximum Size Of Post Data |
Limits the amount of data that can be posted to the server in a single request. ColdFusion rejects single requests larger than the specified limit. |
|||||
Request Throttle Threshold |
Requests smaller than the specified limit are not queued or counted as part of the total memory. Requests larger than the specified limit are counted as part of total memory and are queued if the request throttle-memory size is exceeded. |
|||||
Request Throttle Memory |
Limits total memory size for the throttle. If sufficient total memory is not available, ColdFusion queues requests until enough memory is free. |
|||||
Disable Creation of unnamed application |
Disallows creation of unnamed applications. |
|||||
Allow REST Discovery |
Specify whether to allow Adobe API Manager to discover REST services published in ColdFusion.
|
|
|
Specify if ColdFusion must enable null support. This means that null is not converted into empty strings. |
|
Specify a comma-separated list of file extensions, which will be blocked from being uploaded by the cffile tag/functions. You can use "*"(star) to block all files, or use "" (empty string) to allow all extensions. By default, the following extensions are blocked: AS,ASP,ASPX,BIN,CFC,CFM,CFML,CFR,CFSWF,DMG,EXE,HBXML,JSP,JSPX,JWS,MXML,PHP,SWC,SWS. |
|
|
If you had trimmed the list of file extensions to block for file uploads, the click the button to restore the list of all file extensions. |
|
|
Specify if Java must be used as regex engine. If not selected, Apache ORO is used as default regex engine. |
New in ColdFusion (2018 release)
Executor Pool Configuration for Asynchronous Programming framework
|
Core pool size |
Core pool size is the minimum number of worker threads to keep alive. The value should be less than the value specified in Maximum Pool Size. The default value is 10. |
|
Maximum pool size |
Maximum number of threads that can ever be available in the pool. The default value is 50. |
|
Keep alive time |
Timeout in milliseconds for idle threads waiting for work. Threads use this timeout when there are more than the corePoolSize present in the pool. The default value is 6000 ms. |
These settings enable you to finetune your async executor according to your requirements. Also, these property changes take effect without any server restart.
We have also added the following Admin APIs to support the properties mentioned above. These APIs are a part of runtime.cfc.
In this release, to support the pool configuration settings, we have also added three new properties to the API, getRuntimeProperty(required propertyName). They are:
- corePoolSize
- maxPoolSize
- keepAliveTime
New in ColdFusion (2018 release) Update 2
Settings for mobile.
|
Secret key |
The secret key that you must use in your mobile application. Auto-generate the key or paste an already generated key. |
|
Enable mobile's server workflow |
If you enable this option, the mobile app can make calls to the server. Restart the server after enabling the option. |
|
Enable CORS |
If you enable this option, the server can accept requests from any domain. Restart the server after enabling the option. |
|
Mobile server context |
The context via which a mobile app can make calls to the server. |
Request Tuning
Simultaneous request tuning overview
You can specify the number of simultaneous requests that can be processed for each of the following types of requests:
- CFM page requests
- CFC method invocations (via an HTTP GET)
- Flash Remoting requests
Web Service requests
The settings are contained completely within ColdFusion code and work across all J2EE application servers. You do not have to restart the ColdFusion server for changes to the configuration to take effect. JSP processing is not affected by these changes.Note: The Flash Remoting request control setting applies to remoting that uses ActionScript 2.0 and ActionScript 3.0, with each type treated independently. For example, a setting of 5 means that up to 5 ActionScript 2.0 Flash Remoting and 5 ActionScript 3.0. Flash Remoting requests are allowed simultaneously.
Capabilities by edition
- Standard Edition: Only the Async CFML, DirectoryWatcher, Socket, and user written event gateways are enabled. The maximum number of threads in the pool for the cfthread tag is limited to 10. Only the CFM page request limit is adjustable.
- Enterprise Edition: All event gateways are supported. The number of threads in the pool for the cfthread tag is unlimited. You can adjust the limits for each request type (CFM page, CFC, Flash Remoting, and Web Service) independently.
Request Tuning page
The Request Tuning page of the Administrator contains configuration options that you use to specify the number of different types of requests and threads that ColdFusion can handle simultaneously.
Option |
Description |
|---|---|
Maximum Number Of Simultaneous Template Requests |
The number of CFML page requests that can be processed concurrently. Use this setting to increase overall system performance for heavy-load applications. Requests beyond the specified limit are queued. |
Maximum Number Of Simultaneous Flash Remoting Requests |
The number of Adobe Flash Remoting requests that can be processed concurrently. |
Maximum Number Of Simultaneous Web Service Requests |
The number of Web Service requests that can be processed concurrently. |
Maximum Number Of Simultaneous CFC Function Requests |
The number of ColdFusion Component methods that can be processed concurrently through HTTP. This does not affect starting CFC methods from CFML, only methods requested through an HTTP request. |
Maximum Number Of Simultaneous Report Threads |
The maximum number of ColdFusion reports that can be processed concurrently. |
Maximum Number Of Threads Available For CFTHREAD |
CFTHREAD that runs concurrently. Threads that CFTHREAD creates in excess of the specified limit are queued. |
Timeout Requests Waiting In Queue After n Seconds |
If a request has waited in queue beyond the specified limit, time out the request. This value must be at least as long as the Request Timeout setting (currently 60 seconds). |
Request Queue Timeout Page |
Specify a relative path to an HTML page to send to clients when a template requests time out before getting a chance to run. For example "/CFIDE/timeout.html." This page cannot contain CFML. If a page is not specified, clients receive a 500 Request Timeout error when their request does not get a chance to run. |
Caching page
The Caching page of the Administrator contains configuration options that you can set or enable to cache templates, queries, and data sources. These options can significantly affect server performance. The following table describes the settings:
Option |
Description |
|---|---|
Maximum Number Of Cached Templates |
Enter a value that specifies the number of templates that ColdFusion caches. For best application performance, set this option to a value that is large enough to contain the commonly accessed ColdFusion pages, yet small enough to avoid excessive reloading. You can experiment with a range of values on your development server; a suitable starting point is one page per MB of Java Virtual Machine (JVM) size. |
Trusted Cache |
Use cached templates without checking whether they changed. For sites that are not updated frequently, using this option minimizes file system overhead. |
Cache Template in Request |
When checked, any requested files are inspected only once for potential updates within a request. If unchecked, requested file are inspected for changes each and every time when it is accessed within the same request. For application where templates/components are not expected to reflect updates within the same request, this minimizes file system overhead. This setting does not require restarting the server. |
Component cache |
When checked, component path resolution is cached and not resolved again. This setting does not require restarting the server. |
Save Class Files |
Saves to disk the class files that the ColdFusion bytecode compiler generates. During the development phase, it is typically faster if you disable this option. |
Cache Web Server Paths |
Caches ColdFusion page paths for a single server. Clear this option if ColdFusion connects to a web server with multiple websites or multiple virtual websites. |
Maximum Number Of Cached Queries |
Enter a value to limit the maximum number of cached queries that the server maintains. Cached queries allow retrieval of result sets from memory rather than through a database transaction. Because queries reside in memory, and query result set sizes differ, provide a limit for the number of cached queries. You enable cached queries with the cachedwithin or cachedafter attributes of the cfquery tag. When the maximum number of cached queries is reached, the oldest query is dropped from the cache and replaced with the specified query. If you set the maximum number of cached queries to 0, query caching is unlimited. |
Use Internal Cache to Store Queries |
When you select this option, at server level, internal cache is used to store cached queries. By default, cached queries are stored in QUERY region supported by Ehcache. |
Clear Template Cache Now |
Empties the template cache. ColdFusion reloads templates into memory the next time they are requested and recompiles them if they have been modified. |
Clear Template Cache of Specific Folder |
In the previous releases, you have the option only to clear the trusted cache, which clears the entire system cache. Now you can limit the clearing to folder level using this option. |
Clear Component Cache Now |
Empties the component cache. ColdFusion ignores the resolved path for components and try resolution again. |
Clear Query Cache Now |
Removes the query cache in the server. |
|
Server wide cache engine |
Default server wide caching engine to be used. Choose from:
|
|---|---|
|
Memcached Servers |
Specify comma separated IP addresses of memcached servers like localhost:11211 ,localhost :11212. |
|
Max idle time(seconds) |
Maximum time to idle. |
|
Max life span(seconds) |
Maximum time to live. |
|
Max elements |
Maximum elements in memory. |
|
Redis Server |
Host name or server where Redis is installed. |
|
Redis Server Port |
The port number of the server where Redis is installed. |
|
Password |
of the server where Redis is installed. |
|
Is Cluster |
Specify whether the server where Redis is installed is part of a cluster. |
|
JCS cache settings- choose the data source |
You can use JCS to persist cache into a database, which can be accessed via multiple nodes. |
Client Variables page
You enable client variable default settings in ColdFusion on the Client Variables page of the Administrator. ColdFusion lets you store client variables in the following ways:
In database tables
Note: If your data source uses one of the JDBC drivers bundled with ColdFusion 10, ColdFusion can automatically create the necessary tables. If your data source uses the ODBC Socket or a third-party JDBC driver, you manually create the necessary CDATA and CGLOBAL database tables.
- As cookies in the web browsers
In the operating system registry
Note: Adobe recommends that you do not store client variables in the registry because it can critically degrade performance of the server. If you use the registry to store client variables, you allocate sufficient memory and disk space.
To override settings specified in the Client Variables page, use the Application.cfc file or the cfapplication tag. For more information, see the Developing ColdFusion Applications.
Store client variables in a data source
- On the Client Variables page, in the Select Data Source to Add as Client Store table, select a data source from the drop-down.
- Click Add. The Add/Edit Client Store page for the data source appears.
- Select options for the data source, as described in the following table. (To exit from the page without saving changes, click the left-arrow icon.)
Option |
Description |
|---|---|
Description |
A description of the client data store and its settings. Not displayed for Registry. |
Create Client database tables |
If ColdFusion can determine that the database you use supports SQL creation of database tables, this option appears, and you do not need to create the client variable tables before they are used. In this case, the Create Client Database Tables option appears on the Add/Edit Client Store page; if you select this option, ColdFusion creates the necessary tables in the database. If the database does not support SQL table creation, if the database already has the required tables, or if you are using the Registry, this option does not appear. |
Purge data for clients that remain unvisited for n days |
Typically, client data is saved for a limited time. To delete (purge) client data that has not been accessed in a specified number of days, select this option and enter a value for the number of days. If a cluster of ColdFusion servers uses this data source, ensure that only one server is configured to purge client data. |
Disable global client variable updates |
By default, ColdFusion updates client variables for every page request. To prevent ColdFusion from updating variables, select this option. If updates are disabled, ColdFusion updates global client variables only when they are first created and when they are updated. This helps improve application performance. |
- Click Submit Changes. The Client Variables page appears, with your data source in the list.
- In the Select Default Storage Mechanism for Client Sessions table, select the data source.
- Click Apply.
Store client variables in a cookie or in the system registry
- In the Client Variables page, select Cookie or Registry.
- Click Apply.
Client variable storage options
Storage type |
Advantages |
Disadvantages |
|---|---|---|
Data source |
|
|
Browser cookies |
|
|
System registry |
|
|
Migrating client variable data
To migrate your client variable data to another data source, determine the structure of the database tables that store this information. Client variables stored externally use two simple database tables, as shown in the following tables:
CDATA Table |
|---|
Column |
Data type |
|---|---|
cfid |
CHAR(64), TEXT, VARCHAR, or equivalent |
app |
CHAR(64), TEXT, VARCHAR, or equivalent |
data |
MEMO, LONGTEXT, LONG VARCHAR, or equivalent
|
CGLOBAL Table |
|---|
Column |
Data type |
|---|---|
cfid |
CHAR(64), TEXT, VARCHAR, or equivalent |
data |
MEMO, LONGTEXT, LONG VARCHAR, or equivalent |
lvisit |
TIMESTAMP, DATETIME, DATE, or equivalent
|
Creating client variable tables
Use the following sample ColdFusion page as a model for creating client variable database tables in your own database. However, keep in mind that not all databases support the same column data type names. For the proper data type, see your database documentation.
Note: The ColdFusion Administrator can create client variable tables for data sources that use one of the bundled JDBC drivers. For more information, see the Online Help. |
Sample table creation page
This example applies to Microsoft Access databases.

(
cfid char(20),
app char(64),
data memo
)
</cfquery>

<cfquery name="data2" datasource="#DSN#">
CREATE UNIQUE INDEX id1
ON CDATA (cfid,app)
</cfquery>

<cfquery name="global1" datasource="#DSN#">
CREATE TABLE CGLOBAL
(
cfid char(20),
data memo,
lvisit date
)
</cfquery>

<cfquery name="global2" datasource="#DSN#">
CREATE INDEX id2
ON CGLOBAL (cfid)
</cfquery>

<cfquery name="global2" datasource="#DSN#">
CREATE INDEX id3
ON CGLOBAL (lvisit)
</cfquery>
Memory Variables page
You can specify maximum and default time-out values for session and application variables. Unless you define a time-out value in an Application.cfc or Application.cfm file, application variables expire in two days. Session variables expire when user sessions end. To change these behaviors, enter new default and maximum time-out values on the Memory Variables page of the Administrator.
You can also specify whether to use J2EE session variables. When you enable the J2EE session variables, ColdFusion creates an identifier for each session and does not use the CFToken or CFID cookie value. For more information, see the Developing ColdFusion Applications.You can also determine how ColdFusion stores the session variables - in memory or Redis. Select an option from the Session Storage drop-down list. For more information, see External session storage.
Note:
When using J2EE sessions, ensure that the session time out, specified in the WEB INF/web.xml session-timeout element, is longer than the session time out specified in the ColdFusion Administrator, and longer than any sessiontimeout attribute specified in a cfapplication tag.
Mappings page
Use the Mappings page of the ColdFusion Administrator to add, update, and delete logical aliases for paths to directories on your server. ColdFusion mappings apply only to pages that ColdFusion processes with the cfinclude and cfmodule tags. If you save CFML pages outside the web_root directory (or whatever directory is mapped to "/"), you add a mapping to the location of those files on your server.
Assume that the "/" mapping on your server points to C:\coldfusion2018\wwwroot, but that all of your ColdFusion header pages reside in C:\foo\newpages\headers. Add a mapping in the ColdFusion Administrator that points to C:\foo\newpages\headers, for ColdFusion to find the header pages. For example, add a mapping for /headers that points to C:\foo\newpages\headers. In the ColdFusion pages located in C:\coldfusion2018\wwwroot, you reference these header pages using /headers in your cfinclude and cfmodule tags.
Note:
ColdFusion mappings are different from web server virtual directories. For information on creating a virtual directory to access a given directory using a URL in your web browser, consult your web server documentation.
Mail page
The ColdFusion Enterprise Edition supports mail-server failover, as well as additional mail delivery options.
The ColdFusion implementation of SMTP mail uses a spooled architecture. This means that when a cfmail tag is processed in an application page, the messages generated might not be sent immediately. If ColdFusion has a large queue, delivery could occur after some delay.
Note: For more information about the cfmail tag, see Sending SMTP e-mail with the cfmail tag in Sending and Receiving E-Mail in the Developing ColdFusion Applications. |
Mail Server Settings area
The following table describes basic mail server settings:
Option |
Description |
|---|---|
Mail Server |
Enter a valid mail server for sending dynamic SMTP mail messages in the text box. You can enter an Internet address, such as mail.company.com, or the IP address of the mail server, such as 127.0.0.1. |
Username |
Enter the user name for the mail server, if necessary. |
Password |
Enter the password for the mail server, if necessary. |
Sign |
Select this check box to configure ColdFusion to digitally sign your mails. |
Keystore |
Location of the Keystore containing the private key and certificate. The supported type is JKS (java key store) and pkcs12. |
Keystore Password |
Keystore password. |
KeyAlias |
Alias of the key with which the certificate and private key is stored in Keystore. If it is not specified then the first entry in the Keystore is be picked up. |
KeyPassword |
Password with which the private key is stored. If it is not specified, KeystorePassword is used as KeyPassword. |
Verify Mail Server Connection |
Verifies that ColdFusion can connect to your specified mail server after you submit this form.Even if you do not use this option, send a test message to verify that your mail server connection works. |
Server Port |
Enter the number of the port on which the mail server is running. Contact your server administrator if you are unsure of the appropriate port number. |
Backup Mail Servers (Enterprise Edition only) |
Enter zero or more backup servers for sending SMTP mail messages. You can enter an Internet address, such as mail.company.com, or the IP address of the mail server, such as 127.0.0.1. Separate multiple servers with a comma. If the mail server requires authentication, prepend the mail server with the user name and password, as follows:username:password@mailserveraddress_To use a port number other than the default (25), specify _mailserveraddress:portnumber |
Maintain Connection To Mail Server(Enterprise Edition only) |
Keeps mail server connections open after sending a mail message. Enabling this option can enhance performance when delivering multiple messages. |
Connection Timeout (seconds) |
Enter the number of seconds that ColdFusion should wait for a response from the mail server before timing out. |
Enable SSL Socket Connections To Mail Server |
Enables SSL encryption on the connections to the mail server. |
Enable TLS Connection To Mail Server |
Enables Transport Level Security (TLS) on the connection to the mail server. |
Mail Spool Settings area
The following table describes mail server spool settings:
Option |
Description |
|---|---|
Spool Interval (Seconds) |
Enter the interval, in seconds, at which you want the mail server to process spooled mail. |
Mail Delivery Threads(Enterprise Edition only) |
Enter the maximum number of simultaneous threads used to deliver spooled mail. |
Spool Mail Messages For Delivery To(Memory spooling available for Enterprise Edition only) |
Routes outgoing mail messages to the mail spooler. If you disable this option, ColdFusion delivers outgoing mail messages immediately. In ColdFusion Enterprise Edition, you can spool messages to disk (slower, but messages persist across shutdowns) or to memory (faster, but messages do not persist). You can override this setting in the cfmail tag. |
Maximum Number Of Messages Spooled To Memory(Enterprise Edition only) |
Enter the maximum number of messages that spool to memory before switching to disk spooling. |
View Undelivered Mail |
Click to view undelivered mails. |
Mail Logging Settings area
Select preferences for handling mail logs, as described in the following table:
Option |
Description |
|---|---|
Error Log Severity |
From the drop-down list object, select the type of SMTP-related error message to write to a log file. The options are the following:
|
Log All Mail Messages Sent By ColdFusion |
Saves to a log file the To, From, and Subject fields of all e-mail messages. |
ColdFusion writes sent-mail and mail-error logs to the following directories:
- \coldfusion10\logs (Windows server configuration)
- /opt/coldfusion10/log (Solaris and Linux server configuration)
- cf_webapp_root/WEB-INF/cfusion/logs ( J2EE configurations, all platforms)
The following table describes the e-mail log files:
Log |
Description |
|---|---|
mailsent.log |
Records sent e-mail messages. |
mail.log |
Records general e-mail errors. |
Mail Character Set Settings area
Select preferences for the default mail character set, as described in the following table:
Option |
Description |
|---|---|
Default CFMail CharSet |
From the drop-down list object, select the default character set that the cfmail tag uses. The default value is UTF-8. If most of your e-mail clients use a specific character set, you can use this setting to switch to that locale-specific character set. For example, Japanese mail is typically sent using the ISO-2022-JP character set. |
Scheduled Tasks page
Information that is read more often than written is a good candidate for scheduled tasks. Instead of executing a query to a database every time the page is requested, ColdFusion renders the static page with information that the scheduled event generates. Response time is faster because no database transaction takes place.
You can run scheduled tasks once; on a specified date; or at a specified time, daily, weekly, or monthly; daily; at a specified interval; or between specified dates.
When a scheduled page executes, ColdFusion writes a message to a log file called schedule.log automatically. This file identifies the name of the scheduled action, the page to be executed, and whether the task scheduled executed successfully .You can pause and resume scheduled tasks.
For more information, see cfschedule .
The Scheduled Task page lets you create, edit, pause, resume, and delete scheduled tasks. This page has the following areas:
|
Area |
Description |
|---|---|
|
Schedule New Tasks |
Click to add a new scheduled task. |
|
Pause All Tasks |
Click to pause all running tasks. |
|
Resume All Tasks |
Click to resume tasks that have been paused. |
|
Actions |
Click the icons to run, pause, edit or remove the scheduled task. |
|
Task Name |
Identifies the names of the existing tasks scheduled to run. |
|
Duration |
Identifies the duration of the task to run. |
|
Interval |
Identifies how often this task runs. The values for this column can be Once, Daily, or DailyEvery. |
Application Level Scheduled Tasks:Provides a list of application-specific tasks that you have scheduled, with task details in tabular format. The table provides details such as actions, application name, group, task name, duration, interval, last run, next run, repeat count, and if cluster is enabled.
Note: Application-specific tasks cannot be created using ColdFusion Administrator. But you can pause, resume, or delete the tasks.
- Server Level Scheduled Tasks: Provides a list of server-specific tasks that you have scheduled, with task details in tabular format. The table provides new details such as group, next run, repeat count, if cluster is enabled, and the remaining task count.
- Enable Cluster Setup:Applies if you have at least one data source configured. Specify the following details:
- Select Data source: All the data sources you have connected to are listed.
Create Tables for Cluster Setup:Check to create scheduler-specific tables for cluster.
Note: Enable this option only for one node in the cluster. Otherwise, the tables are overridden. If you have created tables from one node, in other nodes you need to only select and choose the data source. All nodes will point to the same data source and therefore will be part of the cluster.
- After you specify the details, click Submit.
To disable cluster, select the option Disable Cluster.
Add/Edit Scheduled Task page
Add/Edit Scheduled Task page lets you add or edit task. Click Submit after you specify the following tasks. When the page loads for the first time, you are provided with only minimum options to create the task. Click Show Additional Settings to list all settings.
Option |
Description |
|---|---|
Task Name |
Enter a name for the task in the Task Name text box. |
Duration |
Enter the start and end dates for the task. The end date is optional. If you want this task to execute continuously, leave the End Date text box blank. |
Frequency |
Select the schedule for running this task:
|
URL |
Enter the URL for the ColdFusion page that you want to execute. You can execute a local page or a page on a remote ColdFusion Server, assuming that you have the proper access rights. |
Username |
(Optional) Specify a user name only if the page you want to execute is in a secure location. |
Password |
(Optional) Specify a password only if the page you want to execute is in a secure location. |
Timeout |
(Optional) Specify a timeout setting. This helps prevent requests from stalling due to an overloaded web server, a network problem, or a page that takes too long to execute. |
Proxy Server: Port |
(Optional) If this request must be routed through a proxy server, enter the URL and Port number of that proxy server. |
Publish; File |
(Optional) To publish an output file of this task, select the Save Output to a File option and then, in the File text box, enter the full path and filename of the output file. Note that the Publish file in scheduled tasks can now only have .txt and .log extensions by default. You can add more extensions in cfusion\lib\neo-cron xml. |
Resolve URL |
(Optional) Select the Resolve URL option to replace any relative URLs used in links returned in the result page to absolute URLs. |
Group |
The group to which the scheduled tasks belong. Ensure that the combination of task name and group are unique. |
Crontime |
Specify task scheduling time in cron job syntax. |
Overwrite |
If not selected, creates new output files every time the task executes.Select to overwrite the existing output file, instead of creating a new one. |
Eventhandler |
A CFC file whose pre-defined methods are invoked for various events while running the task. The path you specify can be relative to webroot for example, schedulerdemo.eventhandler, or use a ColdFusion mapping. |
Exclude |
Comma-separated list of dates or date range for exclusion in the schedule period. |
On Misfire |
Specify what the server has to do if a scheduled task misfires. |
On Exception |
Specify what to do if a task results in error. |
On Complete |
The action to be performed after the completion of current task. Specify the details in the following format:Task1:Group1,Task3:Group3 |
Priority |
An integer that indicates the priority of the task. |
Retry Count |
The number of reattempts if the task results in an error. |
Cluster |
Enable to execute tasks in cluster setup. |
WebSocket page
Use the ColdFusion Administrator (Server Settings > WebSocket) to specify the following WebSocket-related details:
Option |
Description |
|---|---|
Port |
Port that the WebSocket server listens to. |
Max Data Size |
Data size of packets sent/received. |
Start Flash Policy Server |
Start Flash cross-domain Policy Server on port 1243. This is required for Flash fallback if there is no native WebSocket support at the client side. |
Flash Port |
If Flash Policy server is to be run on a different port other than the default one, it can be configured in neo-websocket.xml file located in <cf_home>/cfusion/lib directory. |
Charting page
The following table describes the caching and thread settings for the ColdFusion charting and graphing server:
Option |
Description |
|---|---|
Cache Type |
Set the cache type. Charts can be cached either in memory or to disk. Memory caching is faster, but more memory intensive. |
Maximum Number Of Cached Images |
Specify the maximum number of charts to store in the cache. After the cache is full, if you generate a new chart, ColdFusion discards the oldest chart in the cache. |
Max Number Of Charting Threads |
Specify the maximum number of chart requests that can be processed concurrently. The minimum number is 1 and the maximum is 5. (Higher numbers are more memory-intensive.) |
Disk Cache Location |
The location that saves the charts when caching to disk. In ColdFusion (2018 release) and ColdFusion (2016 release), you cannot change the location specified. In ColdFusion 10, you could change the location. |
Font Management page
ColdFusion automatically registers Acrobat built-in fonts and fonts located in typical font locations (such as the Windows\fonts directory). However, if your server has additional fonts installed in nonstandard locations, you register them with the ColdFusion Administrator so that the cfdocument and cfreport tags can locate and render PDF and FlashPaper reports.
This page contains the following topics:
- Register New Font with ColdFusion Lets you browse to a directory that contains fonts, or select a specific font.
- User Defined Fonts Displays the fonts that have been registered explicitly.
- Current System Fonts Displays fonts stored in platform-specific system font directories. The following table describes the fields on the Font Management page:
Area |
Description |
|---|---|
New Font/Font Directory |
Specifies a fully qualified path to a directory that contains font files or to a specific font file. The ColdFusion Administrator lets you register the following types of font formats:
|
Font Family |
High-level font name (for example, Arial or Times New Roman). |
Font Face |
A specific font face (for example, Arial Italic or Times New Roman Bold). |
PostScript Name |
Specifies the PostScript name of the font. |
Font Type |
Specifies the font type (for example, TrueType or Adobe Built-In) |
Usable In |
Specifies whether the font is usable in PDF, FlashPaper, or both formats. Note that Adobe built-in fonts are not usable in FlashPaper output format. |
Path |
Fully qualified path to the font file. |
The Font Management page also displays the built-in Acrobat fonts, which are available for PDF only.For more information on reporting in ColdFusion, see Creating Reports and Documents for Printing in the Developing ColdFusion Applications.
About Font Management
ColdFusion can create documents and reports in both PDF and FlashPaper format. Both of these formats require that the server computer have access to the fonts used in the HTML styles (cfdocument tag) or the report definition (ColdFusion Report Builder). ColdFusion requires access to these fonts to properly render text in PDF and FlashPaper documents and, when specified, to embed fonts into a PDF file.
Types of fonts and font extensions
The ColdFusion Administrator lets you register the following types of fonts:
Type |
File extension |
Description |
Usable in |
|---|---|---|---|
True Type |
TTF |
Scaleable font format developed by Apple Computer and supported in all Macintosh and Windows operating systems. |
PDF and FlashPaper |
True Type Collection |
TTC |
A file that contains multiple TrueType or OpenType fonts |
PDF and FlashPaper |
Open Type |
OTF |
An extension of the TrueType font format. |
PDF and FlashPaper |
Adobe printer font |
PFB |
Adobe printer font |
PDF only |
Adobe Font Metrics |
AFM |
A font format that contains general font information and font metrics information. Typically used on Unix only. |
PDF only |
The Font Management page also displays the built-in Acrobat fonts, which are available for PDF only. ColdFusion does not use PFM or FFT fonts.
Font locations
The ColdFusion Administrator automatically displays the fonts discovered in platform-specific default locations, as follows:
- Windows - The Windows/Fonts directory (for example, WINDOWS/Fonts or WINNT/Fonts)
- Unix - The following directories:
- /usr/X/lib/X11/fonts/TrueType
- /usr/openwin/lib/X11/fonts/TrueType
- /usr/share/fonts/default/TrueType
- /usr/X11R6/lib/X11/fonts/ttf
- /usr/X11R6/lib/X11/fonts/truetype
- /usr/X11R6/lib/X11/fonts/TTF
Additionally, you can define fonts stored in other locations on the server. These are called user-defined fonts. For example, you may want to register the Lucida family of TrueType fonts, which the Sun JDK ships in the jdk_root/jre/lib/fonts directory.
Embedding fonts in PDF output
Report developers can optionally specify that ColdFusion embed fonts in the PDF file (FlashPaper always embeds fonts). When using the cfdocument tag, fonts are embedded if fontEmbed is set to yes or selective. When using reports defined in the Report Builder, fonts are embedded if specified in the report definition file.Embedding fonts increases file size, but ensures that reports display appropriately regardless of whether or not client computers have the fonts installed.
Note: Some font licenses prohibit embedding. ColdFusion does not embed fonts marked as not-for-embedding. |
Client requirements
If fonts are not embedded in the PDF file, fonts must be installed on the client computer to ensure that reports display appropriately.Most Windows computers ship with Internet Explorer, which includes the Microsoft Core Fonts, a set of TrueType fonts.
UNIX considerations
If you install ColdFusion on a UNIX computer you must ensure that the appropriate fonts are installed, even if the computer provides console access only.For more information on TrueType fonts for UNIX, see http://corefonts.sourceforge.net/.
ColdFusion Report Builder considerations
The ColdFusion Report Builder has no automatic knowledge of fonts available on the server so the developer building the report definition must consult the ColdFusion MX Administrator to determine which fonts are available on the server and, if necessary, register fonts in the Administrator or install fonts on the computer that runs Report Builder.
| Item | Description |
| Current environment | Select an environment type to change settings. The available types are development, production, and beta. |
| Secret key | The key that you must provide while registering the node. |
| CCS Cluster Name | The name of the cluster that the node belongs to. |
| CCS Server | The IP address of the Central Configuration Server. |
| CCS Port | The port on which you want to run Central Configuration Server. |
| CCS Enabled | Select whether you want to enable or disable CCS for the node. |
| Status | Indicates whether the CCS is actively running on the node. |
| Environment | Specify the type of deployment from where you want to load the settings for the node. The available types are development, production, and beta. |
| Version | Specify the version of deployment from where you want to load the settings for the node. |
Document page
Depending on whether your ColdFusion server is installed on a local or remote server, you can configure OpenOffice with your ColdFusion server instance.
For more information about configuring OpenOffice with ColdFusion, see Configuring OpenOffice in Installing ColdFusion.
Java and JVM page
The Java and JVM page lets you specify the following settings, which enable ColdFusion to work with Java:
Option |
Description |
|---|---|
Java Virtual Machine Path |
The absolute file path to the location of the Java Virtual Machine (JVM) root directory. The default is cf_root/runtime/jre. |
Minimum JVM Heap Size |
The JVM initial heap size. |
Maximum JVM Heap Size |
The JVM maximum heap size. The default value is 512 MB. |
ColdFusion Class Path |
The file paths to the directories that contain the JAR files that ColdFusion uses. Specify either the fully qualified name of a directory that contains your JAR files or a fully qualified JAR filename. Use a comma to separate multiple entries. |
JVM Arguments |
The arguments to the JVM. Use a space to separate multiple entries (for example, -Xint -Xincgc). |
Restart ColdFusion server after making the changes.
aArgs[i] contains '-Xms' |
When you update the Java and JVM Settings page, ColdFusion writes the changes to jvm.config, which is located in cf_root\runtime\bin. Before ColdFusion saves your changes, it saves a copy of the current jvm.config file as jvm.bak. If your changes prevent ColdFusion from restarting, use jvm.bak to restore your system. For example, rename jvm.config to jvm.config_BAD, and then rename jvm.bak to jvm.config.
ColdFusion filters out default settings for the jvm.args attribute from the jvm.config file, including the following:
To use Server Monitor or Multiserver Monitor on a J2EE deployment of ColdFusion on Oracle 10g, in JVM Arguments set -Doc4j.jmx.security.proxy.off=true
Settings Summary page
The Settings Summary page shows all ColdFusion configuration settings. Click a group name to open the Administrator section of that group, where you can edit settings. This page is not enabled in the Standard Edition.
In ColdFusion, you can export the server settings to PDF by clicking the Save As PDF button on this page.
Data and Services section
The Data and Services section of the Administrator is the interface for ColdFusion, data sources, and search and indexing features. The following table describes some common tasks that you can perform in the Data & Services section of the Administrator:
|
Task |
Description |
|
Create and manage JDBC data sources |
The Data Sources page lets you establish, edit, and delete JDBC data source connections for ColdFusion. For more information, see Data Source Management for ColdFusion. |
|
Configure NoSQL data sources |
This section lets you configure, add, and manage your NoSQL data source connections. For more information, see NoSQL data sources. |
|
Create and maintain ColdFusion collections |
The ColdFusion Collections page lets you create and delete Solr collections and perform maintenance operations on collections that you create. For more information, see ColdFusion Collections page. |
|
Define mappings for web services |
The Web Services page lets you produce and consume remote application functionality over the Internet. For more information, see Web Services page. |
|
Specify cloud credentials |
This section lets you add and manage your Cloud service credentials. For more information, see Cloud credentials. |
|
Specify cloud configuration |
This section lets you add and manage your Cloud service configuration. For more information, see Cloud configuration. |
|
GraphQL |
This section lets you define the GraphQL client and service configurations. |
Data Sources page
The Data Sources page lets you create, edit, and delete JDBC data sources. Before you can use a database in a ColdFusion application, you register the data source in the ColdFusion Administrator. For more information, see Data Source Management for ColdFusion.
Before you can access a database with a ColdFusion application, perform the following:
- Understand and determine the database driver required to interact with the data source. ColdFusion uses JDBC database drivers to communicate with data sources.
- Configure the database as a ColdFusion data source by specifying a driver, adding data source information, and connecting to a database.
- Verify the data source.
For more information on adding data sources, see Adding data sources.
ColdFusion Collections page
Use this page to create and manage your Solr collections.
ColdFusion lets you manage your collections from the Administrator. You can index, optimize, purge, reload, or delete Solr collections that are connected to ColdFusion. You use the icons in the Actions column to perform the following actions:
Action |
Description |
|---|---|
Reload |
Reloads the collection. |
Index |
Analyzes the files in a collection and assembles metadata and pointers to the files. |
Optimize |
Reclaims space left by deleted and changed files by consolidating collection indexes for faster searching. You should optimize collections regularly. |
Purge |
Deletes all documents in a collection, but not the collection itself. Leaves the collection directory structure intact. |
Delete |
Deletes a collection. |
ColdFusion includes Solr, which provides indexing and searching technology. This enables creating, populating, and managing collections of indexed data that are optimized for fast and efficient site searches.
A collection is a logical group of documents and metadata about the documents. The metadata includes word indexes, an internal documents table of document field information, and logical pointers to the document files.
For more information about building search interfaces, see Building a Search Interface and Solr search support in the Developing ColdFusion Applications.
If the ColdFusion Collections page is unable to retrieve collections, ensure that Solr Search Server is running.
Populate a Solr collection
After you create a collection, use the Solr Collections section to populate (or index) it, with data from text and binary files, in a directory that you specify. A collection comprises metadata that describes indexed documents. Data from a ColdFusion query can be indexed only by using the ColdFusion cfindex tag. To populate (index) a collection,
- In the list of Solr Collections, click the name of the collection or its Index Collection button. The Index Solr Collections page appears.
- Review the extensions in the File Extensions field. You can add, edit, or remove extensions for files in the collection.
- In the Directory Path field, enter the path to a directory to index. To locate and enter a path, click Browse Server.
- To include subdirectories of the specified directory, select the Recursively Index Sub Directories option.
- (Optional) In the Return URL field, enter the URL prefix used to display documents found in the search in a browser. For example, if you index the ColdFusion documentation directory, the directory you index could be C:\ColdFusion2018\cfusion\wwwroot\cfexample. You would enter the return URL as http://localhost:8500/cfexample/. This assumes that you are using the built-in web server on port 8500.
- Click Submit. ColdFusion populates the collection with data from the specified directory. Then the ColdFusion Collections page appears.
To close the page without saving changes, click Cancel.
Rename or create an alias for a Solr collection
- Click the ColdFusion collection that you need to rename from the ColdFusion Collections page. The Manage Collection page is displayed.
- In the Rename Collection section, enter a new name in the New Name for Collection field and click Submit.
- To specify an alias for the collection, enter the alias in the Collection Alias field and click Submit.
Solr Server page
The Solr server instance runs as a separate server, which you can start or stop as a service. You can configure your Solr collection for indexing and search capabilities using ColdFusion Administrator.
Solr collections
The ColdFusion Administrator implements Solr support using the following panels in the Data & Services area:
- ColdFusion Collections Once a Solr collection is created, use the Index, Optimize, Purge, or Delete Actions under the Solr Collection area at the bottom of the panel. You can also rename and alias a Solr collection in ColdFusion Administrator. To do this,
- Click the ColdFusion collection that you need to rename from the ColdFusion Collections page. The Manage Collection page is displayed.
- In the Rename Collection section, enter a new name in the New Name for Collection field and click Submit.
- To specify an alias for the collection, enter the alias in the Collection Alias field and click Submit.
- Solr Server Configure the Solr server host name, home directory, and other advance settings using the Solr Server page.
Solr server
Use the Solr Server page to specify the Solr server host name and home directory. You can also configure advance settings including the admin port, web application name, and buffer limit.
Click Show Advance Settings to add the following details:
- Solr admin port
- Solr WebApp
- Solr Buffer Limit
- Authentication details
- If to use an HTTPS connection, and if so the Solr HTTPS port.
You can also configure indexing laguages by providing a language name and suffix.
Migrate collections
To migrate the collection, browse and select the old Solr home and then click Migrate Solr Collections.For details, see "Solr enhancements in ColdFusion 10" in Developing Adobe ColdFusion Applications.
Web Services page
Web services let you publish and consume remote application functionality over the Internet. With a web service, you can make a request to the remote application to perform an action. You can use the ColdFusion Administrator to register web services so that clients do not have to specify the entire WSDL URL when they reference the web service. For more information on publishing and consuming web services through ColdFusion, see ColdFusion Developer's Guide.
Add a web service
- In the Web Service Name box, enter the name of the web service.
- In the WSDL URL box, enter the URL for the Web Services Description Language (WSDL).
- Enter a user name and password.
- (If applicable) Specify the proxy server details and credentials.
- (Optional) Specify the timeout value for the web-service request in seconds.
- Click Add Web Service. Your Web Service Name appears in the list of Active ColdFusion Web Services.
Edit a web service
- In the Active ColdFusion Web Services area, click the web service name. The ColdFusion Administrator displays the web service in the top portion of the window.
- Modify settings.
- Click Update Web Service.
View WSDL for a web service
- In the Active ColdFusion Web Services area, click the WSDL URL. The ColdFusion Administrator opens the WSDL in a new browser window.
When you register a web service, you can shorten your code and change a web service URL without editing your code. For more information, see Using Web Services in the Developing ColdFusion Applications.
REST Services page
After you create the CFC you want to REST-enable, specify the folder for registering as web service in the ColdFusion Administrator.
Browse and select the application path or root folder where ColdFusion would search for CFCs.When you specify a folder, all CFCs in that folder or subfolders for which you have specified rest or restPath are registered.
- (Optional) In the Service Mapping section, specify virtual mapping in place of application name. If the folder has an Application.cfc and an application name, then the service is identified with the application name. You can override this by specifying the service mapping. In this case, the service is identified with the service mapping that is provided. If there is no Applicaiton.cfc in the folder, then it is mandatory to specify the Service mapping.
- (Optional) Specify an application as default REST service. Only one application can be set as default for a server instance. You can change the default application at any time. Check Set the default application and then click Add Service. To remove the service as default, uncheck it.
After you specify the details, click Add Service to register. The Active ColdFusion REST Services section specifies the details of all registered web services.
After you register, all CFCs are published as RESTful services. On subsequent startups, the registered services automatically get published.
NoSQL Data Sources section
New in ColdFusion (2021 release)
Specify the name of the data source and then from the Driver drop-down list, choose MongoDB.
The following table lists all the MongoDB settings and their description.
| Setting | Description |
|---|---|
| Host | The host where the mongod instance (or mongos instance for a sharded cluster) runs. |
| Port | The port where the mongod instance (or mongos instance for a sharded cluster) runs. Default is 27017. |
| Replica Set Name | Specify the name of the replica set, if the mongod is a member of a replica set. A replica set in MongoDB is a group of mongod processes that maintain the same data set. Replica sets provide redundancy and high availability, and are the basis for all production deployments. |
| Enable SSL | Enable or disable SSL/TSL for the mongod connection. |
| Is DNS Seedlist | Enable or disable seed list. In MongoDB, a seed list uses DNS to create a list of servers, which can be changed without reconfiguring the client. |
| Auth Mechanism | The method to auhenticate your Mongo data source. The methods are:
For more information, see MongoDB authentication methods. |
| Read Concern | Choose a level of isolation for their reads from replica sets. The options are:
For more information, see MongoDB Read Concern. |
| Read Preference | Read preferences describe the behavior of read operations with regards to replica sets. The options are:
For more information, see MongoDB Read Preferences. |
| Write Concern | Write concern describes the level of acknowledgment requested from MongoDB for write operations to a standalone mongod or to replica sets or to sharded clusters. The w option requests acknowledgement that the write operation has propagated to a specified number of mongod instances or to mongod instances with specified tags. The values that w takes are:
For more information, see MongoDB Write Concern. |
| Write Timeout | Specify a time limit, in milliseconds, for the write concern. |
| Journal | The journal option requests acknowledgement from MongoDB that the write operation has been written to the journal. Journaling creates a log/track of all writes. |
| Connection Timeout | The time in milliseconds to attempt a connection before timing out. |
| Maximum Connection Pool Size | The maximum number of connections in the connection pool. |
| Minimum Connection Pool Size | The minimum number of connections in the connection pool. |
| Maximum Connection Life Time | The maximum life time of a pooled connection. |
| Maximum Connection Idle Time | The maximum number of milliseconds that a connection can remain idle in the pool before being removed and closed. |
| Maximum Connection Pool Wait Time | The maximum time that a pooled connection can wait. |
| Maximum Connection Pool Wait Queue Size | The maximum size of the queue that a pooled connection can wait inside. |
| Heart Beat Frequency | Heartbeat frequency controls when the driver checks the state of the MongoDB deployment. |
| Minimum Heart Beat Frequency | Minimum frequency of heartbeat. |
New in ColdFusion (2021 release)
|
Setting |
Description |
|---|---|
|
Credential Alias |
Define the credentials, as a string, for the cloud service. |
|
Cloud Vendor |
Choose the cloud service provider- AWS or Azure. |
|
AWS options |
For more information, see AWS keys. |
|
GCP Options |
For more information, see Projects in GCP. |
|
Azure options |
Connection string: Enter the connection string. A connection string includes the authorization information required for your application to access data in an Azure Storage account. For more information, see Azure connection string. |
Cloud configuration section
New in ColdFusion (2021 release)
AWS configuration options - S3, DynamoDB, SQS, and SNS
* The settings marked with an asterisk are specific to S3.
| Setting | Description |
|---|---|
| API Call Attempt Timeout | The amount of time to wait for the http request to complete before giving up and timing out. For example, the values can be 10m or 10s. Allowed formats: m (milli seconds), s (seconds), M (minutes), h (hours), d (days) |
| API Call Timeout | The amount of time to allow the client to complete the execution of an API call. For example, the values can be 10m or 10s. Allowed formats: m (milli seconds), s (seconds), M (minutes), h (hours), d (days) |
| Request Headers | The set of HTTP headers that should be sent with every request. Provide a list of headers with each value being an array of strings. |
| * Path Style Access Enabled | Enable to use path-style access for all requests. In a path-style URL, the bucket name is not part of the domain (unless you use a region-specific endpoint). For example, http://s3-aws-region.amazonaws.com/bucket. |
| * Accelerate Mode Enabled | Enable to accerelate uploads and downloads of objects in a bucket. |
| * Dual Stack Enabled | Enable to send requests to S3 buckets over IPv6 and IPv4. |
| * Checksum Validation Enabled | Enable to check the integrity of an object uploaded to an S3 bucket. |
| * Chunked Encoding Enabled | Setting this flag will result in enabling chunked encoding for all requests. |
| Connection Acquisition Timeout | The amount of time to wait when acquiring a connection from the pool before giving up and timing out. |
| Connection Max Idle Time | Configure the maximum amount of time that a connection should be allowed to remain open while idle. |
| Connection Timeout | The amount of time to wait when initially establishing a connection before giving up and timing out. |
| Connection Time to Live | The maximum amount of time that a connection should be allowed to remain open, regardless of usage frequency. |
| Expect continue enabled | Configure whether the client should send an HTTP expect-continue handshake before each request. |
| Max connections | The maximum number of connections allowed in the connection pool. |
| Non proxy hosts | The hosts that the client is allowed to access without going through the proxy. |
| NTLM Domain | For NTLM proxies, the value is the Windows domain name to use when authenticating with the proxy. |
| NTLM Workstation | For NTLM proxies, the value is the Windows workstation name to use when authenticating with the proxy. |
| Username | The user name to use when connecting through a proxy. |
| Password | The password to use when connecting through a proxy. |
| Endpoint | The endpoint of the proxy. |
| Preemptive basic Auth Enabled | Whether to attempt to authenticate preemptively against the proxy server using basic authentication. |
| Use System property values | Enable to use the default proxy system properties, like, proxy password, proxy port, proxy server, and proxy user. |
| Use Idle Connection Reaper | Configure whether the idle connections in the connection pool should be closed asynchronously. |
| Socket Timeout | The amount of time to wait for data to be transferred over an established, open connection before the connection is timed out. |
| Number of Retries | Specify the maximum number of retry attempts. |
| Retry conditions |
|
| Backoff Strategy | Use backoff strategies to mitigate and minimize failures. For example, when requests hold on to resources for a long time, the server can run out of those resources. To manage backoffsm use jitter. Jitter adds some amount of randomness to the backoff to spread the retries around in time. Select one of the following:
|
| Throttle Backoff Strategy | Select one of the following:
|
New in ColdFusion (2021 release)
Azure configuration options - Blob
| Setting | Description |
|---|---|
| Concurrent Request Count | The number of concurrent requests allowed for a Blob operation. |
| Single block size in bytes | The size used for writing a single block. The range is 1 MB-64 MB. |
| Timeout Interval (ms) | The timeout to use when making a request. |
| Maximum Execution time (ms) | The maximum permissible time for a request to execute. After the specified threshold is reached, the request times out. |
| Enable Encryption | Enable RSA encryption on a Blob. |
| Disable content validation | Ignore the ContentMD5 header of a Blob. |
| Store BLOB content | Enable to set a blob's ContentMD5 header for file uploads. |
| Absorb Conditional Errors on Retry | Indicates whether a conditional failure should be absorbed on a retry attempt for the request. |
| Skip Etag Locking | Etag locking is automatically used in blob downloads to ensure that the blob does not change mid-download. Enable the flag to skip the etag locking while downloads. |
| Use Transactional Content | Whether a range PUT or GET operation will use the Content-MD5 header to enforce transactional security. |
| Location mode | Indicates which location must receive the request. The options are:
|
| Retry Policy Type |
|
| Enable logging | Enable to create logs for requests. |
Azure configuration options - Service Bus
|
Setting |
Description |
|---|---|
|
Operation Timeout |
The operation timeout to be used for all Service Bus client operations. For example, 10s or 10m. |
|
Retry Policy |
Choose the retry policy for requests. |
GCP configuration- Storage
| Option | Description |
| Initial Retry Delay | InitialRetryDelay controls the delay before the first retry. Subsequent retries will use this value adjusted according to the RetryDelayMultiplier. Example: 10m, 10s Allowed formats: m (milli seconds), s (seconds), M (minutes), h (hours), d (days). |
| Max Retry Delay |
MaxRetryDelay puts a limit on the value of the retry delay, so that the RetryDelayMultiplier can't increase the retry delay higher than this amount. Example: 10m, 10s Allowed formats: m (milli seconds), s (seconds), M (minutes), h (hours), d (days). |
| Retry Delay Multiplier |
RetryDelayMultiplier controls the change in retry delay. The retry delay of the previous call is multiplied by the RetryDelayMultiplier to calculate the retry delay for the next call. |
| Initial RPC Timeout |
InitialRpcTimeout controls the timeout for the initial RPC. Subsequent calls will use this value adjusted according to the RpcTimeoutMultiplier. Example: 10m, 10s Allowed formats: m (milli seconds), s (seconds), M (minutes), h (hours), d (days). |
| Max RPC Timeout | MaxRpcTimeout puts a limit on the value of the RPC timeout, so that the RpcTimeoutMultiplier can't increase the RPC timeout higher than this amount. Example: 10m, 10s Allowed formats: m (milli seconds), s (seconds), M (minutes), h (hours), d (days). |
| RPC Timeout Multiplier | RpcTimeoutMultiplier controls the change in RPC timeout. The timeout of the previous call is multiplied by the RpcTimeoutMultiplier to calculate the timeout for the next call. |
| Max Attempts |
MaxAttempts defines the maximum number of attempts to perform. If this value is greater than 0, and the number of attempts reaches this limit, the logic will give up retrying even if the total retry time is still lower than TotalTimeout. |
| Total Timeout | TotalTimeout has ultimate control over how long the logic should keep trying the remote call until it gives up completely. The higher the total timeout, the more retries can be attempted. Example: 10m, 10s Allowed formats: m (milli seconds), s (seconds), M (minutes), h (hours), d (days). |
| Connect Timeout |
Sets the timeout in milliseconds to establish a connection. |
| Read Timeout |
Sets the timeout in milliseconds to read data from an established connection. |
GCP configuration- Firestore
| Option | Description |
| Emulator Host | The Firebase Local Emulator Suite emulates products for a single Firebase project. This field sets the emulator host to use with this Firestore client. Expected format is [ hostname:port ] |
| Database Id | Sets the database ID to use with this Firestore client. |
| Initial Retry Delay | InitialRetryDelay controls the delay before the first retry. Subsequent retries will use this value adjusted according to the RetryDelayMultiplier. Example: 10m, 10s Allowed formats: m (milli seconds), s (seconds), M (minutes), h (hours), d (days). |
| Max Retry Delay |
MaxRetryDelay puts a limit on the value of the retry delay, so that the RetryDelayMultiplier can't increase the retry delay higher than this amount. Example: 10m, 10s Allowed formats: m (milli seconds), s (seconds), M (minutes), h (hours), d (days). |
| Retry Delay Multiplier |
RetryDelayMultiplier controls the change in retry delay. The retry delay of the previous call is multiplied by the RetryDelayMultiplier to calculate the retry delay for the next call. |
| Initial RPC Timeout |
InitialRpcTimeout controls the timeout for the initial RPC. Subsequent calls will use this value adjusted according to the RpcTimeoutMultiplier. Example: 10m, 10s Allowed formats: m (milli seconds), s (seconds), M (minutes), h (hours), d (days). |
| Max RPC Timeout | MaxRpcTimeout puts a limit on the value of the RPC timeout, so that the RpcTimeoutMultiplier can't increase the RPC timeout higher than this amount. Example: 10m, 10s Allowed formats: m (milli seconds), s (seconds), M (minutes), h (hours), d (days). |
| RPC Timeout Multiplier | RpcTimeoutMultiplier controls the change in RPC timeout. The timeout of the previous call is multiplied by the RpcTimeoutMultiplier to calculate the timeout for the next call. |
| Max Attempts |
MaxAttempts defines the maximum number of attempts to perform. If this value is greater than 0, and the number of attempts reaches this limit, the logic will give up retrying even if the total retry time is still lower than TotalTimeout. |
| Total Timeout | TotalTimeout has ultimate control over how long the logic should keep trying the remote call until it gives up completely. The higher the total timeout, the more retries can be attempted. Example: 10m, 10s Allowed formats: m (milli seconds), s (seconds), M (minutes), h (hours), d (days). |
| Keep Alive Time | The time without read activity before sending a keepalive ping. Example: 10m, 10s Allowed formats: m (milli seconds), s (seconds), M (minutes), h (hours), d (days). |
| Keep Alive Timeout | The time without read activity after sending a keepalive ping. Example: 10m, 10s Allowed formats: m (milli seconds), s (seconds), M (minutes), h (hours), d (days). |
| Keep Alive Without Calls |
Whether keepalive will be performed when there are no outstanding RPCs. |
| Max Inbound Message Size |
The maximum message size allowed to be received on the channel in bytes. |
GCP configuration- PubSub
| Option | Description |
| Emulator Host | The Firebase Local Emulator Suite emulates products for a single Firebase project. This field sets the emulator host to use with this Firestore client. Expected format is [ hostname:port ] |
| Database Id | Sets the database ID to use with this Firestore client. |
| Initial Retry Delay | InitialRetryDelay controls the delay before the first retry. Subsequent retries will use this value adjusted according to the RetryDelayMultiplier. Example: 10m, 10s Allowed formats: m (milli seconds), s (seconds), M (minutes), h (hours), d (days). |
| Max Retry Delay |
MaxRetryDelay puts a limit on the value of the retry delay, so that the RetryDelayMultiplier can't increase the retry delay higher than this amount. Example: 10m, 10s Allowed formats: m (milli seconds), s (seconds), M (minutes), h (hours), d (days). |
| Retry Delay Multiplier |
RetryDelayMultiplier controls the change in retry delay. The retry delay of the previous call is multiplied by the RetryDelayMultiplier to calculate the retry delay for the next call. |
| Initial RPC Timeout |
InitialRpcTimeout controls the timeout for the initial RPC. Subsequent calls will use this value adjusted according to the RpcTimeoutMultiplier. Example: 10m, 10s Allowed formats: m (milli seconds), s (seconds), M (minutes), h (hours), d (days). |
| Max RPC Timeout | MaxRpcTimeout puts a limit on the value of the RPC timeout, so that the RpcTimeoutMultiplier can't increase the RPC timeout higher than this amount. Example: 10m, 10s Allowed formats: m (milli seconds), s (seconds), M (minutes), h (hours), d (days). |
| RPC Timeout Multiplier | RpcTimeoutMultiplier controls the change in RPC timeout. The timeout of the previous call is multiplied by the RpcTimeoutMultiplier to calculate the timeout for the next call. |
| Max Attempts |
MaxAttempts defines the maximum number of attempts to perform. If this value is greater than 0, and the number of attempts reaches this limit, the logic will give up retrying even if the total retry time is still lower than TotalTimeout. |
| Total Timeout | TotalTimeout has ultimate control over how long the logic should keep trying the remote call until it gives up completely. The higher the total timeout, the more retries can be attempted. Example: 10m, 10s Allowed formats: m (milli seconds), s (seconds), M (minutes), h (hours), d (days). |
| Keep Alive Time | The time without read activity before sending a keepalive ping. Example: 10m, 10s Allowed formats: m (milli seconds), s (seconds), M (minutes), h (hours), d (days). |
| Keep Alive Timeout | The time without read activity after sending a keepalive ping. Example: 10m, 10s Allowed formats: m (milli seconds), s (seconds), M (minutes), h (hours), d (days). |
| Keep Alive Without Calls |
Whether keepalive will be performed when there are no outstanding RPCs. |
| Max Inbound Message Size |
The maximum message size allowed to be received on the channel in bytes. |
|
Setting |
Description |
|---|---|
|
Add Service configuration |
The Configuration contains the following: Service nameA GraphQL service is a server-side implementation of the GraphQL query language. GraphQL is a query language for APIs that allows clients to request only the data they need and get it in a predictable and efficient manner. A GraphQL service typically exposes a schema that defines the types of data that can be queried, and the operations that can be performed on that data. The service receives queries from clients, parses them, validates them against the schema, and executes them to retrieve the requested data from the backend. The service then returns the requested data in a response that matches the structure of the original query. Specify the name of the service. Endpoint URL/Schema pathA GraphQL schema defines the structure and behavior of a GraphQL API. It is a contract between the server and the client, which specifies the types of data that can be queried and the operations that can be performed on that data. The schema also defines the queries, mutations, and subscriptions that can be performed on the data. Queries are used to retrieve data, mutations are used to modify data, and subscriptions are used to receive real-time updates about data changes. The schema requires a path locally or could be hosted on a server. Specify the required path. 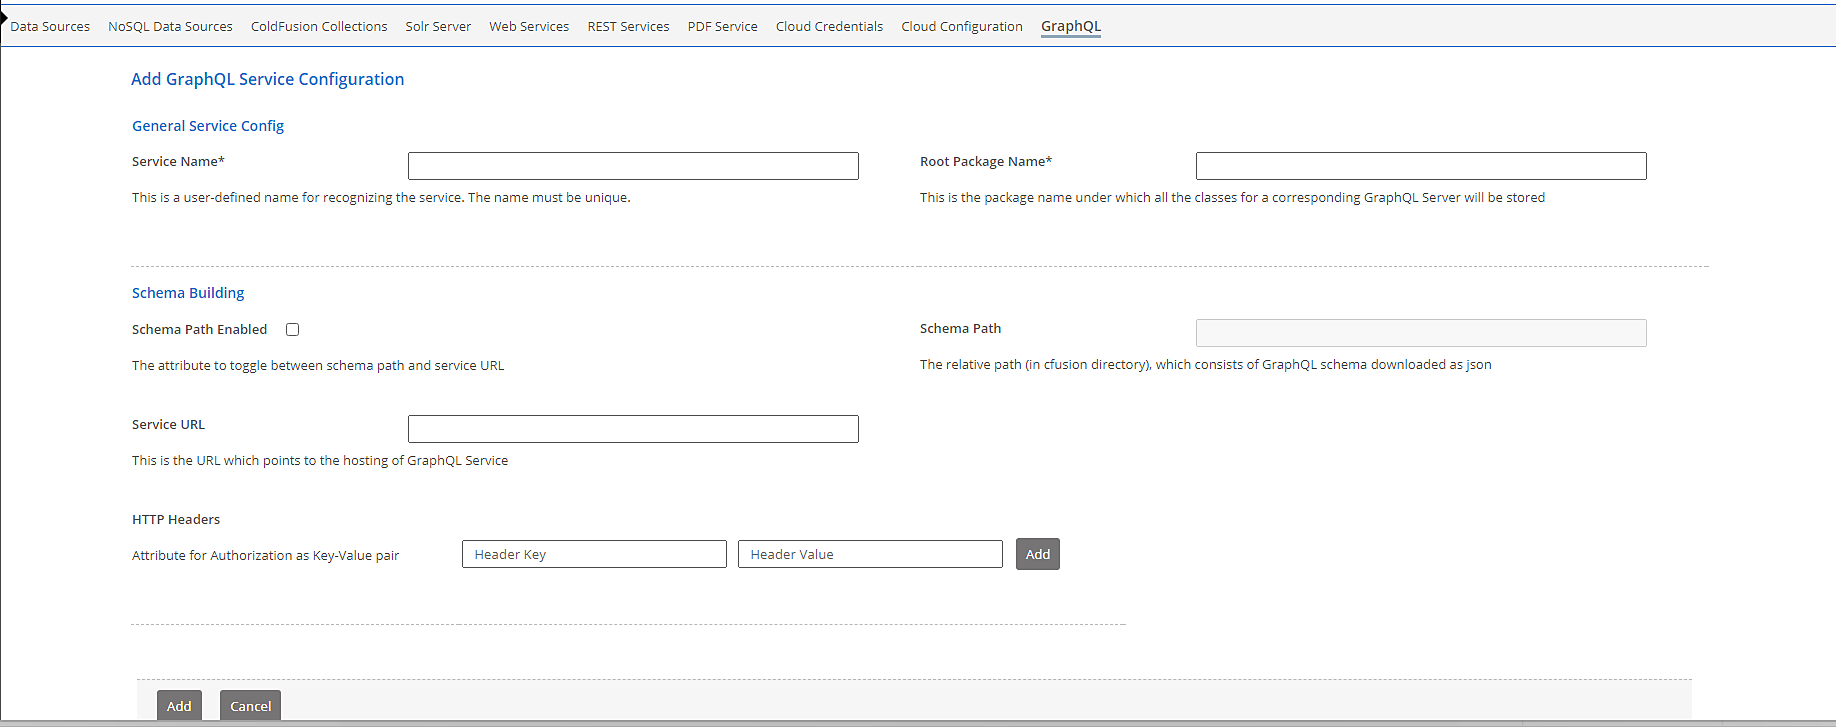
|
|
Add Client configuration |
The Client configuration contains the following: Configuration alias: Enter an alias for the GraphQL service that you'd created. Service configuration: Select the configuration that you'd created previously. 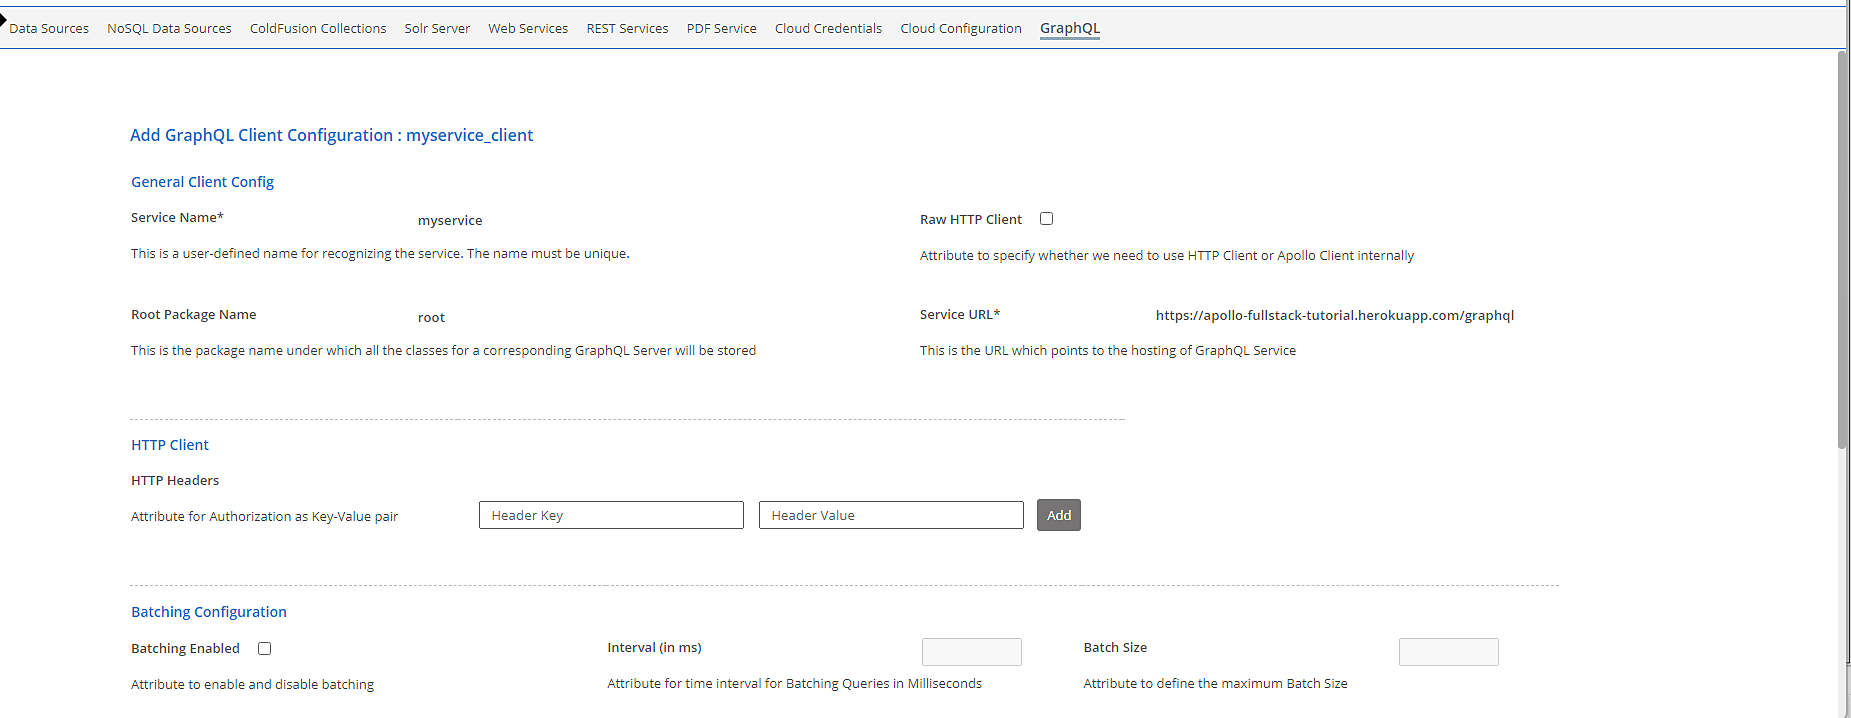
|
Debugging and Logging section
Use the Debugging Settings and Debugging IPs pages to configure ColdFusion to provide debugging information for every application page that a browser request. Specify debugging preferences by using the pages as follows:
- On the Debugging Output Settings page, select debugging output options. If debugging is enabled, the output appears in block format after normal page output.
- On the Debugging IP Addresses page, restrict access to debugging output. If a debugging option is enabled, debugging output is visible to all users by default.
On the Logging Settings page, specify a directory for error log files that can contain useful debugging information.
Note: Enabling debugging affects performance. It is advised that you do not enable debugging on a production server.
Debugging Output Settings page
The Debug Output Settings page provides the following debugging options:
Option |
Description |
|---|---|
Enable Robust Exception Information |
Displays detailed information in the exceptions page, including the physical path and URI of the template, the line number and snippet, the SQL statement used (if any), the data source name (if any), and the Java stack trace. |
Enable Request Debugging Output |
Enables the ColdFusion debugging service. |
Select Debugging Output Format |
Controls debugging format. Select either of the following formats:
|
Report Execution Times |
Reports execution times that exceed a specified time limit. |
General Debug Information |
Show general information about the ColdFusion MX version, template, timestamp, user locale, user agent, user IP, and host name. |
Database Activity |
Shows the database activity for the SQL Query events and Stored Procedure events in the debugging output. |
Exception Information |
Shows all ColdFusion exceptions raised for the request in the debugging output. |
Tracing Information |
Shows trace event information in the debugging output. Tracing lets you track program flow and efficiency using the cftrace tag. |
Timer Information |
Shows output from the cftimer tag. |
Flash Form Compile Errors And Messages |
(Development use only) Displays ActionScript errors in the browser when Flash forms are compiling, and affects the display time of the page. |
Variables |
Displays information about parameters, URL parameters, cookies, sessions, and CGI variables in the debugging output. |
Enable Performance Monitoring(Server configuration only) |
Enables the standard NT Performance Monitor application to display information about a running server. TIP: Restart ColdFusion after you change this setting. |
Enable CFSTAT(Server configuration only) |
Shows performance information on platforms that do not support the NT Performance Monitor. For more information, see Using the cfstat utility. TIP: Restart ColdFusion after you change this setting. |
Using the cfstat utility
The cfstat command-line utility provides real-time performance metrics for ColdFusion. The cfstat utility uses a socket connection to obtain metric data. You can use the cfstat utility to display information that ColdFusion writes to the System Monitor without using the System Monitor application. The following table lists the metrics that the cfstat utility returns:
Metric abbreviation |
Metric name |
Description |
|---|---|---|
Pg/Sec |
Page hits per second |
The number of ColdFusion pages processed per second. You can reduce this limit by moving static content to HTML pages. |
DB/Sec |
Database accesses per second |
The number of database accesses per second that ColdFusion makes. Any difference in complexity and resource load between calls is ignored. |
Req Q'ed |
Number of queued requests |
The number of requests that are currently waiting for ColdFusion to process them. Lower values, which you can achieve with efficient CFML, are better. |
Req Run'g |
Number of running requests |
The number of requests that ColdFusion is currently actively processing. |
Req TO'ed |
Number of timed out requests |
The total number of ColdFusion requests that have timed out. Lower values, which you can achieve by aggressive caching, removing unnecessary dynamic operations and third-party events, are better. |
AvgQ Time |
Average queue time |
A running average of the time, in milliseconds, that requests wait for ColdFusion to process them. Lower values, which you can achieve with efficient CFML and enhanced caching, are better. Averages are displayed for the last two completed requests. |
AvgReq Time |
Average request time |
A running average of the time, in milliseconds, that it takes ColdFusion to process a request (including queued time). Lower values, which you can achieve with efficient CFML, are better. Averages are displayed for the last two completed requests. |
AvgDB Time |
Average database transaction time |
A running average of the time that ColdFusion spends on database-related processing of ColdFusion requests. Averages are displayed for the last two completed requests. |
Bytes In/Sec |
Bytes incoming per second |
The number of bytes that ColdFusion read in the last second (not an average). |
Bytes Out/Sec |
Bytes outgoing per second |
The number of bytes that ColdFusion wrote in the last second (not an average). |
Before you use the cfstat utility, ensure that you selected the Enable Performance Monitoring option in the ColdFusion Administrator (on the Debugging & Logging > Debugging Settings page). If you select this option, restart ColdFusion for this change to take effect.
cfstat options
The cf_root/bin directory contains the cfstat utility. From that directory, type cfstat and use the following switches:
Switch |
Description |
Comment |
|---|---|---|
-n |
Suppress column headers. |
Useful for saving output to a file. |
-s |
Display output in a single line. |
Display a single line and delay display of the first line so the cfstat utility can display meaningful values in the per-second counters. |
# |
Where # is an integer, display output every # seconds. |
If you do not specify an integer, the cfstat utility returns one line. Specify this switch with or without the s switch. |
-x |
Display extended output breaking of different request threads. |
Available in ColdFusion Enterprise. It is ignored in ColdFusion Standard. |
-port |
Allows you to specify the port to which ColdFusion listens for cfstat communications. |
When using cfstat from two different ColdFusion server instances, their port numbers of the said server instances should be explicitly specified. |
This example runs the cfstat utility and displays a new line every 20 seconds:
cfstat 20 |
Developer Profile page
Enable Developer Profile
Enable this option to use REST Playground app. It is recommended to disable developer profile in Production/Lockdown environments to disable REST Playground.
The following settings get changed when you enable the developer profile:
- Trusted Cache is disabled
- Robust Exception is enabled
- REST Discovery is enabled
Debugging IP Addresses page
Use the Debugging IP Addresses page to restrict debugging output to one or more IP addresses. You can add and remove IP addresses.
To add a debugging IP address,
- In the Debugging IP Addresses page, enter an IP address that you want to receive debugging output. The default IP address is 127.0.0.1.
- Click Add.
- (Optional) To add the IP address of the computer you are using, click Add Current. The list below the IP Address field shows the IP addresses that you added.
To remove a debugging IP address: - Select an IP address from the list.
Click Remove Selected. The address no longer appears in the list.
Debugger Settings page
Note:
If you do not specify IP addresses, and debugging options are active, ColdFusion displays debugging output for all users.
To use the ColdFusion Debugger that runs in Eclipse, select the Allow Line Debugging option.
Specify the port and the maximum number of simultaneous debugging sessions. Specify the debugger port in the JVM settings of your application server, for example:
-Xrunjdwp:transport=dt_socket,server=y,suspend=n,address=#portNum# |
To stop a currently running debugging session, click Stop Debugging.
For the changes that you specify on this page to take effect, restart the ColdFusion server.
Logging Settings page
Use the Logging Settings page of the Administrator to change ColdFusion logging options. The following table describes the settings:
Option |
Description |
|---|---|
Log Directory |
Specifies the directory to which error log files are written. TIP: Restart ColdFusion after you change this setting. |
Maximum File Size (kb) |
Sets the maximum file size for log files. When a file reaches this limit, it automatically is archived. |
Maximum Number Of Archives |
Sets the maximum number of log archives to create. When they reach this limit, files are deleted in the order of oldest to newest. |
Log Slow Pages Taking Longer Than n Seconds |
Logs the names of pages that take longer than the specified interval to process. Logging slow pages can help you diagnose potential problems or bottlenecks in your ColdFusion applications. Entries are written to the server.log file. |
Log All CORBA Calls |
Logs all CORBA calls. |
Enable Logging For Scheduled Tasks |
Logs ColdFusion Executive task scheduling.
|
Log Files page
The Log Files page lets you perform operations on log files, such as searching, viewing, downloading, archiving, and deleting.
Click a Log File icon located in the Actions column of the Available Log Files table, to search, view, download, archive, or delete a log file.
Use the Logging Settings page to enable or disable administrative logging options, as the following table describes:
Option |
Description |
|---|---|
Log directory |
Select this option to change the location where ColdFusion log files are written. The location that you specify in this field must have sufficient disk space and security privileges for the ColdFusion system service. |
Maximum file size (KB) |
Set the maximum file size for log files. When a file reaches this size, ColdFusion automatically archives it. |
Maximum number of archives |
Set the maximum number of log archives to create. After reaching this limit, ColdFusion deletes files in order of oldest to newest. |
(UNIX only) Use operating system logging facilities |
Select this option to log messages using the UNIX syslog logging facility. ColdFusion also writes log messages to the standard ColdFusion log files. |
Log slow pages taking longer than n seconds |
Specify the number of seconds that ColdFusion waits before logging the names of pages that take longer than the specified interval to process. Logging slow pages can help you diagnose potential problems in your ColdFusion applications. ColdFusion writes entries to server.log. |
Log all CORBA calls |
Select this option to log all CORBA calls. |
Enable logging for scheduled tasks |
Select this option to log ColdFusion Executive task scheduling. |
The following table describes the ColdFusion log files:
| Log file | Description |
|---|---|
| application.log | Records every ColdFusion error reported to a user. Application page errors, including ColdFusion syntax, ODBC, and SQL errors, are written to this log file. |
| audit.log | Records administrator's login/logout tracking and update actions. |
| axis2.log | Records web service calls. |
| car.log | Records errors associated with site archive and restore operations. |
| coldfusion -error.log | Records ColdFusion Server errors. All exceptions thrown within a ColdFusion application are logged to exception.log and not coldfusion -error.log. |
| coldfusion -out.log | Records server start/stop activities. |
| customtag.log | Records errors generated in custom tag processing. |
| derby.log | Records Derby database actions. |
| esapiconfig.log | Records configuration details from esapi library used for security. |
| eventgateway.log | Records events and errors related to event gateways. |
| exception.log | Records stack traces for exceptions that occur in ColdFusion. |
| feed.log | Records any feed to ColdFusion. |
| flash.log | Records entries for Flash Remoting. |
| ftp.log | Records FTP/SFTP connection details. |
| hibernatesql.log | Records information from Hibernate library. |
| http.log | Records HTTP calls. |
| mail.log | Records errors generated by an SMTP mail server. |
| mailsent.log | Records messages that ColdFusion sends. |
| migration.log | Records errors related to upgrading from a previous version of ColdFusion. |
| migrationException.log | Records errors related to running ColdFusion applications after upgrading from a previous version of ColdFusion. |
| monitor.log | Records ColdFusion Server Monitor activities (memory, requests data). |
| portlet.log | Records information of ColdFusion portlets. |
| probes.log | Records system probes that help in evaluating the status of your ColdFusion application. |
| rdservice.log | Records errors that occur in the ColdFusion Remote Development Service (RDS). RDS provides remote HTTP-based access to files and databases. |
| restservice.log | Records REST web-service related messages. |
| server.log | Records errors for ColdFusion. |
| scheduler.log | Records scheduled events that have been submitted for execution. Indicates whether task submission was initiated and whether it succeeded. Provides the scheduled page URL, the date and time executed, and a task ID. |
| security.log | Records security-related events. |
| update.log | Records information that occurs while applying the updates. |
| webservice.log | Records information that is created while invoking a web service. |
| websocket.log | Records websocket calls. |
| exception.log | Records application exceptions. |
Enable/Disable logging
Use the icon for start/stop in the Actions column of the Log Files page to stop/start logging for a particular log type.
Filter log content
- To open the Log Filter, click Launch Filter on the Log Viewer page.
- In the Log Filter dialog box, specify one or more of the following options:
Option |
Description |
|---|---|
Show Serverity |
Select one or more severity levels to filter. |
Keywords |
Enter one or more words in the Keywords text box. Click the Find drop-down list box, and select one of these options: exact phrase, any words, or all words. |
Applications |
If applicable, enter the application name to filter. If applicable, the application name appears as the fifth (entry) column in the log file. |
Thread IDs |
The thread identification numbers are used by Adobe Technical Support personnel to track and troubleshoot problems. The thread identification string appears as the fourth entry (column) in a log file. |
Most Recent |
Specifies the relative age of included messages. |
Date Range |
To display the log content for a specific date range, enter the start and end dates. Enter the dates in year-month-day format ( YYYY-MM-DD). For example, to specify April 21, 2002, enter: 2002-04-21. |
Time Span |
To show the log content for a specific time range, enter the start and end times. Enter the time span in hour-minute-second format ( HH:MM: SS). For example, to specify 2:00 P.M., enter 14:00:00. |
- To begin the filter process, click one of the following options:
- Show Matches Displays results that match the filter criteria specified on the tab.
- Hide Matches Displays results that exclude any information that matches the filter criteria specified on the tab.
Log files introduced in ColdFusion 9.0.1
You can generate log files for the following services in ColdFusion 9.0.1:
- http
- ftp
- web service
- Portlet
- Derby
- Feed
System Probes page
System probes help you evaluate the status of your ColdFusion applications. Like scheduled tasks, they access a URL at a specified interval, but they can also check for the presence or absence of a string in the URL. If the URL contents are unexpected, or if an error occurred while accessing the URL, the probe can send an e-mail alert to the address specified on the System Probes page. The probe can also execute a script to perform a recovery action, such as restarting the server. All probe actions are logged in the logs/probes.log file. The System Probes page also displays the status of each probe.
Use the buttons in the Actions column in the System Probes table to perform the following actions:
Action |
Description |
|---|---|
Edit |
Lets you edit the probe. |
Run |
Runs the probe immediately, even if it was previously disabled. |
Enable/Disable |
Starts and stops the probe from automatically executing at its specified interval. |
Delete |
Deletes the probe. |
Because probes run as scheduled ColdFusion tasks, they do not run if the server on which they are hosted crashes, or if the host web server crashes or otherwise does not respond.
System Probes page
Use the System Probes page to manage the ColdFusion system probes that were created to monitor the availability of a resource in your website.
Item |
Description |
|---|---|
Define New Probe |
Click this button to create a probe configuration. |
Actions |
Click these buttons to run, edit, delete, or disable an existing probe configuration. |
Probe Name |
Shows the names of the ColdFusion probes created. |
Status |
Shows the current operating state of one or more configured probes per URL, as follows:
|
Interval |
Shows the period between probes. |
URL |
Identifies the URL path that each probe is monitoring. |
Notification |
Notification Email Recipients Specify the e-mail address of the recipient if a probe fails to connect to the specified URL. |
Specify the e-mail address of sender. By default, this address is the address specified on the Mail Server page. |
|
Probe.cfm URL |
Specifies the probe.cfm page that is located in the CFIDE directory. ColdFusion requires this page to successfully execute probe configurations. |
Probe.cfm Username |
If the CFIDE directory is secured, the user name for that directory is required. |
Probe.cfm Password |
If the CFIDE directory is secured, the password for that directory is required. |
Suspend probe operation
In the System Probes table, select the name of the probe to suspend, and click the Disable Probe icon.
Add/Edit System Probe page
- In the ColdFusion Administrator navigation pane, click System Probes. The System Probes page appears.
- In the System Probes page, do one of the following:
- Define a new probe. Click Define New Probe. The Add/Edit System Probe page appears.
- Edit an existing probe configuration. Locate and click the probe name. The Add/Edit System Probe page appears.
- In the Add/Edit System Probe page, specify or edit the following settings:
Option |
Description |
|---|---|
Probe Name |
Provide a name for the probe configuration. |
Frequency |
Select the schedule for running this probe:
|
URL |
Identifies the URL path that each probe is monitoring. |
User Name |
Name If the URL is a secured path, specify the user name. |
Password |
If the URL is a secured path, specify the password. |
Timeout (sec) |
Specify the time, in seconds, to indicate how long the probe should wait before registering a failure. |
Proxy Server |
If this request must be routed through a proxy server, enter the URL and port number of that proxy server. |
Port |
Port number of the proxy server. |
Probe Failure |
Select this option to identify the arguments used to test the URL resource. |
Failure Actions |
Specify one or both of the following actions to occur when detecting a failure:
|
Publish |
Select to write output results to a file. |
File |
If the publish option is selected, specify the output filename. |
Reolve URL |
Select to maintain links to internal URLs remain intact.
|
Code Analyzer page
The Code Analyzer page evaluates your ColdFusion pages for potential incompatibilities between ColdFusion 10 and previous versions of ColdFusion. It reviews the CFML pages that you specify and informs you of any potential compatibility issues. Additionally, the Code Compatibility Analyzer detects unsupported and deprecated CFML features, and outlines the required implementation changes that ensure a smooth migration.
Use the analyzer as follows:
- In the left navigation pane, select Debugging & Logging > Code Analyzer.
- Enter or browse to a directory that contains the ColdFusion pages to analyze.
- (Optional) Click Advanced Options to specify the following items:
- Whether to analyze subdirectories.
- The file types to analyze (separate multiple files with semicolons).
- Whether to filter by severity. All reports error and info data, Error reports code that will not execute properly, and Info reports that you should consider editing, but will execute properly; for example, deprecated tags.
- Whether to validate CFML. Reports invalid syntax in your CFML; for example, a comment that has an opening ColdFusion comment tag, and a closing HTML tag.
- The product features to analyze.
License Scanner page
The License Scanner page searches the local subnet to find other running instances of ColdFusion. You can use this information to determine whether the ColdFusion instances within the subnet are licensed appropriately.
The ColdFusion Administrator uses universal datagram protocol (UDP) multicast to collect license and version information from all ColdFusion instances running within the subnet.
Performance Monitoring Toolset
Monitoring Settings
Performance Monitoring Toolset is an application monitoring suite to enable developers gain insight on how applications perform at run time .
In this section, you can modify the following settings:
ColdFusion Hostname: The IP/address of the instance where ColdFusion is installed.
Connected to datastore: Specifies if the Performance Monitoring Toolset is configured with a datastore. The datastore contains information about the performance of various nodes and clusters. This information is collected and displayed by ColdFusion 2018 Performance Monitoring Toolset.
Monitoring Shared Secret: Secret to configure Performance Monitoring Toolset with ColdFusion.
Monitoring Enabled: Specifies if Performance Monitoring Toolset will monitor a ColdFusion instance or server.
Server Monitoring section
Note:
Server Monitor has been removed in ColdFusion (2018 release). However, Server Monitor is still available in ColdFusion (2016 release) and earlier versions.
For more information, see Performance Monitoring Toolset in the previous section.
The Server Monitoring section lets you run the following:
- Server Monitor
- Multiserver Monitor
The Server Monitor is an Adobe SWF application that lets you track activities on a ColdFusion Server. You can identify information about the server, including requests, queries, memory usage, and errors. You can start and stop collecting server information and take snapshots of the server.
The Multiserver Monitor is another SWF application. It lets you track the status of several servers.
Extensions section
Use the Extensions section of the Administrator to configure ColdFusion to work with other technologies, such as Java and CORBA.
Java Applets page
The Java Applets page of the Administrator lets you register applets and edit and delete applet registrations. Before you can use Java applets in your ColdFusion applications, register them in the Java Applets page.
When your applet is registered with ColdFusion, using the cfapplet tag in your CFML code is simple, because all parameters are predefined: Enter the applet source and the form variable name to use.
This page has the following areas:
- Register New Applet: Registers a Java applet to include in your ColdFusion applications.
- Actions: Click the Edit icon to edit registration fields of a Java applet. Click the Delete icon to remove the registration of a Java applet.
- Applet: Click the name of a Java applet to view or edit the registration fields for that applet.
- *Code:*Identifies the name of the file that contains the applet subclass.
- Method: If applicable, this column identifies the method name used in the name attribute of the cfapplet tag.
- Code Base: This area identifies the directory that contains the applet components.
To register or modify a Java applet in ColdFusion, use the Add/Edit Registered Java Applet page. Registering an applet lets you use the cfapplet tag.
Register a Java applet or modify the registration
- If you are registering a new Java applet, install the Java class files and any other files required for the class. Make a note of the installation path, because you must specify the code base arguments when you register the applet.
- To access the Add/Edit Registered Java Applet page:
- For new registration, select Extensions > Java Applets, and click Register New Applet. The Add/Edit Registered Java Appletpage appears.
- For existing registration, in the Registered Java Applets table, click the name of the Java applet registration that you want to view or modify.
- On the Add/Edit Registered Java Applet page, specify or modify the following information:
Option |
Description |
|---|---|
Applet Name |
Provide a name for the Java applet. |
Code |
Identify the name of the file that contains the applet subclass. This filename is relative to the code base URL. The *.class file extension is not required. |
Code Base |
Provide the URL of the code base; the directory that contains the applet components. The applet class files must be located within the web browser root directory; for example, http://<servername>/classes.Note that this field is not required if the Java applet components are contained in a JAR file. For more information, see the Archive option. |
Archive |
(Optional) If the Java applet components are stored in a jar file, enter the jar filename in the Archive text box. |
Method |
(Optional) Specify the method name in the applet that returns a string value. This method name is used in the name attribute of the cfapplet tag to populate a form variable with the method's value. If the applet has no method, leave this field blank. |
Height |
Enter a measurement in pixels for the vertical space for the applet. |
Width |
Enter a measurement in pixels for the horizontal space for the applet. |
Vspace |
Enter a measurement in pixels for the space above and below the applet. |
Hspace |
Enter a measurement in pixels on each side of the applet. |
Align |
Select an alignment option. |
Not supported message |
Specify a message that will be displayed by browsers that do not support Java applets. You can override this message with a different message notsupported attribute in the cfapplet tag. |
Parameter name |
Enter a name for each required applet parameter. Your Java applet typically provides the parameter name needed to use the applet. Enter each parameter in a separate parameter field. |
Value |
Enter a default value for every parameter name specified. Click Add to add the values for the parameters. Your applet documentation provides guidelines on valid entries.
|
CFX Tags page
Before you can use a CFX tag in ColdFusion applications, register it. Use the CFX Tags page to register and manage ColdFusion custom tags built with C++ and Java.
You can build CFX tags in the following two ways:
- Using C++ as a dynamic link library (DLL) on Windows or as shared objects (.so or .sl extension) on Solaris and Linux
- Using Java interfaces defined in the cfx.jar file
The page has the following areas:
Area |
Description |
|---|---|
Register Java CFX |
Click this button to register a CFX Java tag that you want to include in your ColdFusion applications. |
Register C++ CFX |
Click this button to register a CFX C++ tag that you want to include in your ColdFusion applications. |
Actions |
Click the Edit icon to edit the registration fields of a CFX tag. Click the Delete icon to remove the registration of a CFX tag. |
Tag Name |
Click the name of a CFX tag to view or edit the tag's registration fields. |
Type |
Identifies the type of language used to build the CFX tag (C++ or Java). |
Description |
Identifies the use of the CFX tag. |
Add/Edit CFX Java Tag page
Option |
Description |
|---|---|
Tag Name |
Enter the tag name (after the cfx_prefix). Provide a name for the CFX tag that you are registering. |
Class Name |
Enter the class name (without the .class extension) that implements the interface. The class file should be accessible from the Class Path setting on the Java and JVM page. You typically package the .class file in a .jar file and save it in the cf_root/lib (server configuration) or cf_webapp_root/WEB-INF/cfusion/lib (J2EE configuration) directory. |
Description |
Provide a message that identifies the use of this CFX tag. |
Add/Edit CFX C++ Tag page
Option |
Description |
|---|---|
Tag Name |
Provide a name for the CFX tag that you are registering. Tag names must be prefixed with cfx_. |
Server Library (.dll) |
Enter the path to the library, or click Browse Server to locate the library that you want to use. |
Procedure |
Enter the procedure that implements the CFX tag. The procedure name must correspond with the procedure associated with the DLL or shared object you have specified. Notice that procedure names are case sensitive. |
Keep Library Loaded |
Select this option to retain the library in RAM. |
Description |
In this text box, provide a message that identifies the use of this CFX tag.
|
Custom Tag Paths page
Use the Custom Tag Paths page of the Administrator to add, edit, and delete custom tag directory paths.
By default, all custom tags are stored under the cf_root/ CustomTags (server configuration) or cf_webapp_root/WEBINF/cfusion/CustomTags (J2EE configuration) directory. However, you can specify additional paths to your custom tag locations by using this page. The following table describes the areas on the page:
Area |
Description |
|---|---|
New Path |
Specify the path of your custom tags. |
Browse Server |
Click to browse your system fro the location of your custom tags. |
Add Path |
Click to add the path specified in the path text box. |
Actions |
Click Exit to edit or Delete to remove a selected path. |
Path |
Identifies the custom tag paths registered in ColdFusion.
|
CORBA Connectors page
Use the CORBA Connectors page to register, edit, and delete CORBA connectors. Register CORBA connectors before you use them in ColdFusion applications and restart the server when you finish configuring the CORBA connector.
ColdFusion loads object request broker (ORB) libraries dynamically by using a connector, which does not restrict ColdFusion developers to a specific ORB vendor. The connectors depend on the ORB runtime libraries provided by the vendor. A connector for Borland Visibroker is embedded within ColdFusion. Make sure that the ORB runtime libraries are in cf_root/runtime/lib (server configuration) or cf_webapp_root/WEB-INF/cfusion/lib (multiserver and J2EE configurations).
The following table contains information about the libraries and connectors:
Operating System |
Vendor |
ORB |
ColdFusion connector |
ORB library |
|---|---|---|---|---|
Windows NT and later |
Borland |
VisiBroker 4.5 |
coldfusion.runtime.corba.VisibrokerConnector (embedded) |
vbjorb.jar |
Solaris |
Borland |
VisiBroker 4.5 |
coldfusion.runtime.corba.VisibrokerConnector (embedded) |
vbjorb.jar |
Example of a CORBA connector configuration for VisiBroker:
ORB Name visibroker |
ColdFusion includes the vbjorb.properties file, which contains the following properties that configure the ORB:
| org.omg.CORBA.ORBClass=com.inprise.vbroker.orb.ORB org.omg.CORBA.ORBSingletonClass=com.inprise.vbroker.orb.ORB SVCnameroot=namingroot |
Event Gateways section
The Event Gateways section of the Administrator lets you configure event gateway settings, gateway types, and gateway instances.
ColdFusion event gateways are ColdFusion elements that let ColdFusion react to or generate external events or messages in an asynchronous manner. Event gateways let a ColdFusion application handle information that does not come through an HTTP request. For example, you can use event gateways to handle instant messages, short messages from mobile devices, or messages sent to a TCP/IP port. ColdFusion includes several event gateways, including an SMS (Short Message Service) gateway for sending short, often text, messages to and from wireless devices, such as mobile phones or pagers and a gateway for the XMPP (Extensible Messaging and Presence Protocol) instant messaging protocol.
Event Gateways Settings page
The Event Gateways Settings page lets you configure settings for all event gateways, and start or stop the Short Message Service (SMS) test server. The following table describes the settings:
Option |
Description |
|---|---|
Enable ColdFusion Event Gateway Services |
Specifies whether the service is enabled. Changing this setting restarts the service. |
Event Gateway Processing Threads |
Specifies the maximum number of threads used to execute ColdFusion functions when an event arrives. A higher number uses more resources, but increases event throughput. |
Maximum Number Of Events To Queue |
Specifies the maximum number of events allowed on the event queue. If the queue length exceeds this value, gateway events are not be added to the processing queue. |
Start/Stop SMS Test Server |
Starts and stops the short message service (SMS) test server. |
Gateway Types page
The Gateways Types pages let you configure the types of gateways available on your system. After you configure a type, you can create any number of gateway instances of that type.
Option |
Description |
|---|---|
Type Name |
Specifies a name for the event gateway type (for example, SMS for the SMS event gateway). |
Description |
Specifies a description for the gateway type. |
Java Class |
Specifies the fully qualified name of the gateway class full Java class name (for example, coldfusion.eventgateway.sms.SMSGateway for the SMS event gateway). |
Startup Timeout nSeconds |
Specifies a startup timeout, in seconds. |
Stop on Startup Timeout |
If enabled, ColdFusion stops the gateway class if it times out on startup. If disabled, ColdFusion logs a warning message when the timeout value is exceeded. |
The following table describes the event gateway types that ColdFusion includes:
Gateway type |
Description |
|---|---|
CFML |
Triggers asynchronous events from ColdFusion. |
DataManagement |
Lets a ColdFusion application notify a Flex destination about changes in the data that the destination manages. |
DataServicesMessaging |
Sends messages to and receive messages from Flex applications. |
FMS Gateway |
Modifies data through the ColdFusion application or the Flash client, and reflects the change in the Flash Media Server shared object. |
SMS |
Used to send and receive SMS messages. |
SAMETIME |
Used to send and receive instant messages through Lotus SameTime. |
XMPP |
Used to send and receive instant messages through the Extensible Messaging and Presence Protocol (XMPP). |
Samples |
Sample gateway types, including the following:
|
Gateway Instances page
The Gateway Instances page lets you configure ColdFusion event gateway instances to direct events from various sources to ColdFusion components (CFCs) that you have written. The following table describes the settings:
Option |
Description |
|---|---|
Gateway ID |
A name for the event gateway instance. You use this value in the ColdFusion GetGatewayHelper and SendGatewayMessage functions. |
Gateway Type |
The event gateway type. |
CFC Path |
The absolute path to the listener CFC that handles incoming messages. |
Configuration File |
(Optional) Configuration file, if necessary for the event gateway instance. |
Startup Mode |
The event gateway startup status, as follows:
|
Security section
The Security section of the Administrator lets you configure the security frameworks of ColdFusion.
For more information on security, see Administering ColdFusion Security.
RDS page
Use the RDS page to enable and disable password-restricted RDS access to server resources from Adobe Macromedia Dreamweaver MX , Adobe Macromedia HomeSite+ , ColdFusion Extensions for Eclipse, or the ColdFusion Report Builder, and to change the RDS password.
You can also configure all users to use a single RDS password, or allow only users defined in the User Manager to have access through RDS. The minimum character limit is 5 and the maximum character limit is 50.
In ColdFusion 10, you can enable/disable RDS using ColdFusion Administrator. That is, you can modify the settings that you made at the time of installation using ColdFusion Administrator.
The RDS page on the ColdFusion Administrator (Security > RDS) lets you enable/disable RDS service.
Sandbox security page
You use the Sandbox Security page (called Resource Security in the Standard Edition) to specify security permissions for data sources, tags, functions, files, directories, IP addresses, ports, and runtime permissions.
Sandbox security uses the location of your ColdFusion pages to determine functionality. A sandbox is a designated area (CFM files or directories that contain CFM files) of your site to which you apply security restrictions. By default, a subdirectory (or child directory) inherits the sandbox settings of the directory one level above it (the parent directory). If you define sandbox settings for a subdirectory, you override the sandbox settings inherited from the parent directory.
Use sandbox security to control access to the following:
- Data sources
- Tags
- Functions
- Files and directories
IP addresses and ports
You can also edit runtime permissions for ColdFusion pages.Note: If you have enabled sandbox security and want to use the Administrator API, enable access to the CFIDE/adminapi directory.
For details, see Using sandbox security
User Manager page
Use the User Manager page to specify the user name, password, description, access rights, exposed services, sandboxes, and allowed roles for individual users. This page is especially useful for web hosting when multiple ColdFusion applications are on one server, each maintained by a different user or organization.
You can grant access to the ColdFusion Administrator, which also grants access to the Administrator API.
If the administrator revokes the role of a user while the user is logged in, the revocation takes effect only when the user logs in again.
The default user ID of an administrator is admin. To change the administrator user ID, add the following in the neo-security.xml file, replacing admin with the user ID to use:
| <var name='admin.userid.root'> <string>admin</string> </var> |
The User Manager lets you create users that have individually tailored access to portions of the ColdFusion Administrator, the Administrator API, or RDS access.
Note: To grant ColdFusion Administrator permissions to multiple users, in addition to creating users on the User Manager page, you must select the Separate Username And Password Authentication option on the Security > Administrator page. Similarly, you must select the Separate Username And Password Authentication option on the RDS page to grant RDS access to multiple users. |
- In Security > User Manager, click Add User.
- For external users, choose SAML or LDAP. Doing so will enable the user to log in to the Administrator using the selected mechanism.
- Specify the username, password, and then confirm the password.
- Optionally, enter a description.
- Select the following options:
- Allow RDS access
- Allow Administrative access: Select one of the following: Administrator Console & API Access and API Access Only.
- Select the ColdFusion Administrator pages that you want the user to be able to access.
- Select any sandboxes that you want the user to be able to access.
- Select the services that you want the user to be able to access.
Click Add User.
Note: To select multiple contiguous sandboxes or roles, press the Shift key while making selections. To select multiple noncontiguous sandboxes or roles, press the Control key while making selections.
After you create a user, you must log into the ColdFusion Administrator using both a username and password. The default username for the root administrator is admin. To change it, you must edit the neo-security.xml file by changing the string "admin" in admin.userid.root, as follows:
<var name="admin.userid.root">
<string>admin</string>
</var>When you grant access to specific Administrator pages, the user sees only those pages after logging in to the Administrator. When you grant Administrator API access and select roles, the user can access the API only for the pages you specified.
For information editing existing user configuration, see Edit User Configuration.
User Sandboxes
If you change the pages or sandboxes to which a user is allowed access while that user is logged in to the Administrator, the changes take effect only after the user logs out, and then logs in again. For details about creating sandboxes, see Administering ColdFusion Security.
Exposed Services
ColdFusion exposes existing enterprise services as web services. You can access these services using SOAP and AMF/Flash remoting. You can select the services available to a user from the Exposed Services section. By default, all the services are listed in the Allowed Services list box. Press CTRL and select the services that you do not want the user to avail and click the >> button.Now, click Edit User to implement the changes to the user settings. The following are the exposed services:
- Allowed services: Mail Service, Document Service, PDF Service, Image Service, Chard Service, POP Service,
- Prohibited services: Exchange Service
You can secure the exposed services to prevent access by unknown applications or users. This can be done by configuring the client IP address range to which services are accessible. Also, you can set up user access control for the services.On the Security > User Manager page, you can select the services available to a user from the Exposed Services section. By default, all the services are listed in the Prohibited Services list box.Press CTRL and select the services that you want the user to avail and click the << button. Now, click Edit User to implement the changes to the user settings.
Edit user configuration
In the User Manager page, click either the user name like in the User column or the Edit icon in the Action column. The User Manager page opens in Edit mode, where you can reconfigure the user account settings such as password, RDS Administrator access, adding sandboxes, and resetting the exposed services for the user.
Note: You would not be able to reset the user authentication type in the edit mode. |
Allowed IP Addresses
Specify client IP addresses that have the permission to access exposed services.
Also see IP Restriction for CFIDE URLs.
IDP configuration
|
Setting |
Description |
|---|---|
|
Name |
Specify the name of the Identity Provider configuration to be created. |
|
Description |
Description of the Identity Provider. |
|
Import from SAML URL |
The SAML URL interface of the service provider, where the Identity provider sends the authentication token. |
|
Import from an existing SAML Definition |
SAML metadata is used to share configuration information between the Identity Provider (IdP) and the Service Provider (SP). For more information, see SAML metadata by OASIS. In the Metadata field, paste the SAML metadata from the IDP. |
|
Import from XML file in local system |
The IDP metadata XML file contains the IdP certificate, the entity ID, the redirect URL, and the logout URL. Import the XML file of the metadata definition. |
|
Create your own SAML Definition |
Create a custom SAML:
|
SP configuration
| Setting | Description |
|---|---|
Name |
Specify the name of the Identity Provider configuration to be created. |
Description |
Description of the Identity Provider. |
Entity Id |
A uniquely identifiable identifier for the IDP. |
SSO URL |
The URL which points to the Single Sign On service of the IDP. |
SLO URL |
The URL which points to the Single Logout service of the IDP |
SSO Binding |
The binding to be used for sign on requests. |
SLO Binding |
The binding to be used for logout requests. |
HTTP POST binding |
The SAML request is prepared according to the configuration provided by Identity Provider, encoded to base 64 string and loaded into a HTML form as one of the form input fields. |
HTTP Redirect binding |
The SAML request is prepared according to the Identity Provider configuration and is embedded in the query parameter of the Identity Provider URL. |
Sign Requests |
Enable this option if you want the request to be signed. |
Encrypt Requests |
Enable this option if you want the request to be encrypted. |
Sign Certificate and Encrypt Certificate |
Create your own certificate using, for example, keytool, and upload it to CF Administrator. |
| Request Store | Request store helps match outgoing requests and incoming responses with the Identity Provider to help protect against Replay Attacks.
|
External Authentication
| None | No authentication mechanism to access ColdFusion Administrator. |
| SAML | Select the following:
|
| LDAP | LDAP authentication refers to the process of authenticating users against an LDAP (Lightweight Directory Access Protocol) server. LDAP is a protocol used for accessing and maintaining distributed directory information services over an IP network. When a user attempts to authenticate using LDAP, their credentials (such as username and password) are sent to an LDAP server. The server verifies the credentials and responds with an authentication success or failure message. |
Packaging and Deployment section
The Packaging and Deployment section of the Administrator lets you create and deploy CAR files. You can also create J2EE EAR or WAR files that include an existing ColdFusion application and the ColdFusion runtime system.
The ColdFusion Archives page includes tools that let you archive and deploy ColdFusion applications, configuration settings, data source information, and other types of information to back up your files faster. The complete list of archivable information includes the following:
- Archive information
- Assoc. Files/Dirs
- Server Settings - The following are migrated as part of the archive file:
- Settings
- Caching
- Basic Security
- Variables
- Java and JVM
- Logging
- Debugging
- Charting
- Custom Tag Paths
- Watcher Settings
- Server Monitor Settings
- System Probes
- Update Settings
- Web Sockets
- Web Service
- PDF Service
- Remote Inspection Settings
- Solr Server Settings
- ColdFusion Mappings
- Data Sources
- NoSQL Data Sources
- Java Applets
- CFX Tags
- REST Services
- Cloud Settings
- Archive to do list
- Archive Summary
After you archive the information, you can use the Administrator to deploy your web applications to the same ColdFusion server or to a ColdFusion server running on a different computer. Additionally, you can use these features to deploy and receive any ColdFusion archive file electronically.
The Archive Settings page lets you configure various archive system settings that apply to all archive and deployment operations. For more information, see the Online Help.
Build an archive
To archive a definition,
- To access the ColdFusion Archives page, select Packaging and Deployment > ColdFusion Archives in the left navigation pane of the ColdFusion Administrator.
- On the ColdFusion Archives page, locate the name of the archive definition that you want to archive, and then click the Build Archive icon. The Archive Wizard appears.
- In the Archive Wizard, review the archive summary information, and then click Next to continue. The Choose Archive File Location page appears.
- In the Choose Archive File Location page, do the following:
- In the File Name text box, specify the full path where you want to store the archive, followed by the name of the archive. The archive name must have a .car extension.
- For U NIX users only: If you must run this archive as a privileged user, select the Run This Archive As A Specific User option, and then enter any system account name in the User name text box and the corresponding account password in the Password text box. The user name and password must match the existing user name and password for this system; the archive process will run as that user. If the user name and password do not match the existing user name and password for this system account, the build procedure fails.
- Click Next to create the archive.
When the archive operation completes, one of the following archive messages appears:
- Build Successful: The archive was successfully created and stored in the location that you specified in step 4. Click OK and then click Close on the wizard page.
- Build Failed: The archive was not created. To determine the cause of the problem, review the information appearing on the page, and click Details to further analyze the cause of the problem.
JEE Archives page
ColdFusion lets you create an EAR or WAR file that contains an entire application. This archive file contains the ColdFusion web application, settings for ColdFusion (such as data source definitions), the CFM pages used by your application (text or compiled Java), and optionally, the ColdFusion Administrator. This feature lets you quickly create an archive file that a J2EE administrator can use to deploy your ColdFusion application.
J2EE archives are different from ColdFusion archives (CAR) files. For information on CAR files, see ColdFusion Archives page.
Context root Because the J2EE environment supports multiple, isolated web applications running in a server instance, each J2EE web application running in a server is rooted at a unique base URL, called a context root (or context path). The J2EE application server uses the initial portion of the URL (that is, the portion immediately following http://_hostname_) to determine which web application processes an incoming request.For example, if you are running ColdFusion with a context root of cfmx, you display the ColdFusion Administrator using the URL http://_hostname_/_cfmx_/CFIDE/administrator/index.cfm.Most J2EE application servers allow one application in each server instance to use / (forward slash) for the context root. The Remote Development Services (RDS) web application is not required if you use a context root of /.
The J2EE Archives page lets you create an enterprise application archive (EAR) file or web application archive (WAR) file that contains the following items:
- The ColdFusion web application.
- Server settings, such as data sources and custom tag paths.
The CFML pages of your application, stored in the root directory of the ColdFusion web application.
With this EAR or WAR file, a J2EE administrator can deploy your ColdFusion MX application to a J2EE application server.Note: If you are creating a cluster of server instances when running the multiserver configuration, use this page to create the WAR or EAR files required to create each of the servers in the cluster.
You can create a J2EE archive regardless of whether you are running ColdFusion MX in the server configuration or the J2EE configuration. However, you must be running the J2EE configuration to deploy an EAR or WAR file.
Option |
Description |
|---|---|
Achive Name |
Specifies a name for the J2EE archive definition. This is also the name given to the EAR or WAR file. |
Application Directory |
Specifies the location of the CFM files to be included beneath the web root of the ColdFusion web application. |
Distribution Directory |
Specifies the directory where ColdFusion places the EAR or WAR file. ColdFusion uses the name archivename.ear or archivename.war, depending on the archive type. |
Archive Type |
Specifies whether ColdFusion creates a Web Application Archive (WAR) file or an Enterprise Application Archive (EAR) file. |
Context Root (valid for EAR) |
If you create an EAR file, you can optionally specify a context root for the ColdFusion web application. The default is an empty context root. For more information, see J2EE Archives. If you create a WAR file, the context root is handled in an application-server-specific manner. In some application servers, the default context root is the name of the WAR file; in others, you specify the context root using the deploy tool or through a server-specific configuration file. |
Serial Number |
Specifies a valid serial number for ColdFusion Enterprise Edition. |
Previous Serial Number (if Upgrade) |
Specify the serial number of the previous ColdFusion installation. |
Include COM Support |
Include COM Support Specifies whether to include the modules that provide COM support. Omitting COM support reduces the size of the archive by about 12 MB. |
Disable Debugging |
Specifies whether to disable debugging in the ColdFusion web application. |
Include CFML Source |
Specifies whether to use the original CFM files or to convert the pages to Java bytecode. |
Include CF Administrator |
Specifies whether to include the modules and directories for the ColdFusion Administrator (the CFIDE directory structure). Omitting the ColdFusion Administrator reduces the size of the archive by about 2 MB. |
Configure Data Sources to be Included in Archive |
Specifies the data sources to include in the J2EE archive. Use the Right and Left Arrow buttons to select and remove data sources. Use the Double Arrow buttons to select and remove all data sources with one click. |
Package Manager
New in ColdFusion (2021 release)
In the ColdFusion Administrator, in the Package Manager page, you can install or uninstall the packages via a User Interface. For more information, see ColdFusion Package Manager.
Click Package Manager ad you can view the installation options.
Packages
Core Server
Check for updates to the core packages. Click the button Check for Updates and see a list of available updates.
Installed Packages
The Installed Packages section lists all packages that are already installed. You can also uninstall all the installed packages.
Available Packages
The Available Packages section lists packages that are not yet installed. Click Install All to install the packages simultaneously..
Settings
This section provides options to specify update preferences such as update notifications or if to automatically check for updates.
If you have set up a local update site, you can also specify URL of that site to get updates.
Auto-Check
Click Auto-Check to see if any package updates are available for installation. You will receive a notification when a new update is available for download.
Notification
Provides options to specify update preferences such as update notifications or if to automatically check for updates.
Update Site
If you have set up a local update site, specify the URL of that site to get updates.
Proxy Settings
If you host the packages on a server that is behind a proxy server, then provide these details:
- Proxy host
- Proxy port
- Proxy username
- Proxy password
Licensing and Activation
New in ColdFusion (2021 release)
For more information, see Licensing and Activation.
Enterprise Manager section
The Enterprise Manager section of the Administrator lets you create Tomcat server instances with ColdFusion already deployed, register remote Tomcat server instances, and create clusters of Tomcat server instances.
Instance Manager page
The Instance Manager page lets you view the local and remote Tomcat servers that can be accessed by a cfusion server running.
From this page you can access pages that define new, local, Tomcat servers and register existing Tomcat servers running on remote computers, as follows:
- Add New InstanceCreate a Tomcat server and automatically deploy a copy of the current ColdFusion MX application into that server.
- Register Remote Instance Define an existing remote Tomcat server to the Instance Manager for adding these servers to a cluster. It is not mandatory to run the remote Tomcat server instance when you define it to the Instance Manager. However, it must be running before you can add it to a cluster.
- Edit ColdFusion Server: Modify built-in web server settings for a server instance.
Available servers
Area |
Description |
|---|---|
Actions |
Lets you start, stop, restart, and delete a Tomcat server. |
Name |
Specifies the Tomcat server name. If the server is started, you can click this name to open a browser window to the Tomcat server's web root. |
Server Directory |
Specifies the server directory. |
HTTP Port |
Specifies the port for the built-in web server. |
Remote Port |
The remote port for the server instance. |
Host |
Specifies the host name or IP address for the server instance. |
Cluster |
Cluster Specifies the name of the cluster that contains the server. |
- By default, the Instance Manager deploys a copy of the current cfusion application (data sources, settings, administrator password, and so on).
- You can optionally use the Create from EAR/WAR option to create a server with a previously archived application.
Cluster Manager page
The Cluster Manager page in ColdFusion Administrator lets you create and manage clusters of Tomcat servers, each containing the same ColdFusion application.
- Add a cluster by typing a name in the Cluster Name box, and clicking Add. This creates a cluster and adds it to the Configured Clusters table.
- Add servers to the cluster by clicking the Edit icon next to the cluster name in the Configured Clusters table. This displays the Edit Cluster Page.
Edit Cluster Page
The Edit Cluster page in ColdFusion Administrator lets you define the server instances for a cluster and to customize cluster settings.
Managing clusters
Manage clusters using the ColdFusion Administrator. If your ColdFusion application uses session replication, sticky sessions are not typically required.
When session replication is enabled, Tomcat propagates session-variable information to all servers in the cluster every time a session variable changes. Consider whether the application's business requirements require session replication and whether your network incurs the increased traffic before enabling session replication. Consider using client variables instead of session variables.
In the ColdFusion Administrator, click Enterprise Manager > Cluster Manager.The sticky sessions and session replication options require the use of J2EE Sessions by all instances participating in the cluster. To enable J2EE sessions, go to the Memory Variables page and enable the Use J2EE session variables option. Do this for each server in the cluster.
- Enter a cluster name and then click Add.
- Click the cluster name and move the servers to the cluster based on the requirement.
- (If required) Edit the multicast port.Multicast port is used to group the cluster members together. Default value of multicast port is 45564. After you create a cluster, the port is added in the cf_install_dir\cfusion\config\cluster.xml file. For more information on multicast port, see http://tomcat.apache.org/tomcat-6.0-doc/config/cluster-membership.html.
- Specify if you need sticky session.Sticky session ensures that after a session is established on an instance, all future requests from the client are mapped to that instance.
- Click Submit.
Adding a remote instance to a cluster
To add a remote instance to a cluster, add the cluster block to the remote instances server.xml. Then, register the remote instance and add the instance to the cluster. For more information on configuring clusters on Tomcat, see http://tomcat.apache.org/tomcat-5.5-doc/cluster-howto.html.
- Register the remote instance to the local machine.
- Create a cluster in the local machine.
- Open the cf_install_dir_instance-name_runtime\conf\server.xml file of the remote instance.
Add the following block between the entries </host> }}and {{</engine>:
<Cluster className="org.apache.catalina.ha.tcp.SimpleTcpCluster"
channelSendOptions="8">
<Manager notifyListenersOnReplication="true" expireSessionsOnShutdown="false" className="org.apache.catalina.ha.session.DeltaManager">
</Manager>
<Channel className="org.apache.catalina.tribes.group.GroupChannel">
<Membership port="45565" dropTime="3000" address="228.0.0.4" className="org.apache.catalina.tribes.membership.McastService" frequency="500">
</Membership>
<Receiver port="4003" autoBind="100" address="auto" selectorTimeout="5000"
maxThreads="6" className="org.apache.catalina.tribes.transport.nio.NioReceiver">
</Receiver>
<Sender className="org.apache.catalina.tribes.transport.ReplicationTransmitter">
<Transport className="org.apache.catalina.tribes.transport.nio.
PooledParallelSender">
</Transport>
</Sender>
<Interceptor className="org.apache.catalina.tribes.group.interceptors.
TcpFailureDetector">
</Interceptor>
<Interceptor className="org.apache.catalina.tribes.group.interceptors.
MessageDispatch15Interceptor">
</Interceptor>
</Channel>
<Valve className="org.apache.catalina.ha.tcp.ReplicationValve" filter="">
</Valve>
<Valve className="org.apache.catalina.ha.session.JvmRouteBinderValve">
</Valve>

<ClusterListener className="org.apache.catalina.ha.session.JvmRouteSessionIDBinderListener">
</ClusterListener>
<ClusterListener className="org.apache.catalina.ha.session.
ClusterSessionListener">
</ClusterListener>

</Cluster>
5. In the entry, update the membership port with the multicast port of the cluster.
6. Using the ColdFusion Administrator of the local host, add the local instance and the remote instance to the cluster.
7. Restart all the instances.
Server Updates
In ColdFusion 10 or higher, the ColdFusion Administrator lets you verify and make product updates from the browser-interface itself.
For more information, see Install Adobe ColdFusion hotfix.
Updates page
Verify if there are any product updates using the ColdFusion Administrator (Server Update > Update). The updates can include hot fixes and security hot fixes for ColdFusion 10.
The Updates page has the following options:
- Available updates: Click Check for Updates to see if any updates are available for installation.With ColdFusion 10, you can receive a notification when a new hot fix is available for download by subscribing to RSS feeds using the following URL:http://www.adobe.com/support/coldfusion/downloads_updates.html. For a multi-server setup, when you apply the updates from the main instance, you have option to select all local instances to which you may opt to apply hot fix . By default, update applies only to the main instance. If you apply the updates from a newly created local instance, the hot fix is applied only to that specific instance. You have to apply the hot fix to other instances from the main instance or individually from each instance. Before the update, the main ColdFusion instance automatically stops. But you have to manually stop all other instances (for which you want to apply the updates).
Download: Downloads and places the file in <cf_home>/hf-updates/ for later installation.
Note: If your server is behind a firewall or has no outbound internet access, note that you can download the hotfix file from another machine via this URL: http://download.adobe.com/pub/adobe/coldfusion/xml/updates.xml. You can then place the hotfix file on the ColdFusion server and apply the hotfix either with the Admin interface or via the command-line. If you place it in a locally web-accessible location, you can even configure the updater settings to point to that local URL as the location for ColdFusion to find the updates. See the discussion on the "settings" section, below.
Similarly, if you're behind a proxy and would need to specify proxy information for ColdFusion to access the public hotfix URL, you can provide that information (proxy host, port, user, and password) by modifying the jvm.config on the ColdFusion server where the Administrator is being used.
Download and install: Downloads the hot fix and performs a silent installation.
Note: This option does not apply to J2EE installations. Also, in the case of multi-server installations, you have to select the server on which you want to install the hot fix .
- Installed updates: Lists all updates to ColdFusion 10 that you have installed. For multi-server setup, it shows the list of updates to the instance to which you have logged in from the ColdFusion Administrator.Use the option Uninstall to remove the installed hot fix (if needed).
Settings: Provides options to specify update preferences such as update notifications or if to automatically check for updates.
If you have set up a local update site, you can also specify URL of that site to get updates. To do this, populate the updates. xml (see the following sample) and then update the URL in the Administrator (Server Update > Updates > Settings > Update Site > Site URL). For example, http://IPAddress:Port/updates/updates.xml. The following is a sample updates.xml:
<?xml version="1.0" encoding="UTF-8"?>
<rss version="2.0">
<channel>
<title>ColdFusion_10_Update</title>
<description>Upload_description</description> <item>
<title>Hot_Fix_Name</title>
<description>Hotfix_Description</description>
<pubDate>Tue, 19 Oct 2011 11:09:11 -0400</pubDate>
<cfhf_id>HotFix_ID</cfhf_id>
<cfhf_type>Cumulative</cfhf_category>
<cfhf_updatelevel>Integer indicating Hotfix Chronology</cfhf_updatelevel>
<cfhf_filename>Hotfix_installer_file_name</cfhf_filename>
<cfhf_technotelink>Link_to_Technote</cfhf_technotelink>
<cfhf_servers>
<cfhf_server version="10,0,0">

<cfhf_downloadlink>http://localhost:8500/updates/install060811.jar
</cfhf_downloadlink> <cfhf_checksum>20f33dd56597b68c3634be08116bc84a</cfhf_checksum>
<cfhf_filename>hotfix_1.jar</cfhf_filename>
<cfhf_installinput>
<OPTIONAL_![CDATA[ HTML for input fields ]]>
</cfhf_installinput>
</cfhf_server>
</cfhf_servers>

</item>
</channel>
</rsst>
Download hot fix for later installation
- Ensure that JRE is in your system path, or directly access Java from the installation directory of ColdFusion.
- Access the downloaded files from the following location:<cf_home>/hf-updates/
- At command prompt, do the following:
For standalone installations
Platform |
Description |
|
|---|---|---|
On Windows(Installation possible in either GUI or Silent mode) |
In GUI mode:
|
|
On Linux/Solaris/UNIX(Installation possible in either console or silent mode) |
In Console mode:
|
|
On Mac OSX(Installation possible in either GUI, Silent, or Console mode) |
In GUI mode:
|
By default, after applying the hotfix, servers are restarted. If you do not want the servers to restart, additionally, provide the following command:
- For console and GUI mode: Run the following argument: DDONOT_START_SERVERS_POST_INSTALL=true
- For silent installation: Add the property DONOT_START_SERVERS_POST_INSTALL=true to the properties file.
For J2EE installations
Platform |
Description |
||
|---|---|---|---|
On Windows(Installation possible in either GUI or Silent mode) |
In GUI mode (for exploded EAR/WAR deployment):
|
||
On Linux/Solaris/UNIX(Installation possible in either console or silent mode) |
In Console mode (for exploded EAR/WAR deployment):
|
||
On Mac OSX(Installation possible in either GUI, Silent, or Console mode) |
In GUI mode (for exploded EAR/WAR deployment):
|
Note: When you create a new instance from ColdFusion Administrator, hot fixes applied to the default instance is automatically applied to the new instance that you create. |
Uninstalling from command prompt
1. If you have installed from command prompt in Console or UI mode, from the ColdFusion root directory, run the following command:
<CF_ROOT>\jre\bin\java -jar <CF_ROOT>\cfusion\hf-updates\hf-11-xxxxx\uninstall\uninstaller.jar |
(Modify the command according to your path/OS/Hotfix)
2. If you have installed from the ColdFusion Administrator, from the ColdFusion root directory, run the following command:
<CF_ROOT>\jre\bin\java -jar <CF_ROOT>\cfusion\hf-updates\hf-11-xxxxx\uninstall\uninstaller.jar |
3. If you have installed the hotfix using silent installation on your own, uninstallation can also be done silently. Run the following command:
<CF_ROOT>\jre\bin\java -jar <CF_ROOT>\cfusion\hf-updates\hf-11-xxxxx\uninstall\uninstaller.jar -i SILENT |
Even though you have installed hotfix to 5 instances using a single script, there is only one hotfix uninstaller for all these 5 instances for a given update (Usually this is under cfusion instance. It can be under other instances if cfusion was not opted for HF). When you invoke the previously mentioned commands, it will uninstall the hotfix from all the 5 instances.
Extensions section
You can extend the functionality of the ColdFusion Administrator by adding links to other web applications and sites. These links appear under the Custom Extensions section in the left navigation pane of the Administrator.
Extend the Administrator
- Create a file that contains the HTML link code, followed by a <BR>, with a separate line for each link. Do not include other HTML code, such as <head> or <body> tags. The target attribute is required for each link; if you specify target="content", the page appears in the main pane of the Administrator. If you specify any other value for the target attribute, the page appears in a new window.
Save this file as extensionscustom.cfm in the Administrator root directory (/CFIDE/administrator/).
For example, the following file adds links for Bowdoin College, Universidad Complutense de Madrid, and La Sapienza:<a href="http://www.bowdoin.edu/" target="content">Bowdoin College</a><br>
<a href="http://www.http://www.ucm.es/" target="_blank">Universidad Complutense de Madrid</a><br>
<a href="http://www.uniroma1.it/" target="_blank">La Sapienza</a><br>When you click a link, the page appears.
Alternatively, you can extend the ColdFusion Administrator by editing the wwwroot/CFIDE/administrator/custommenu.xml file.
Administrator API
You can use the Administrator API to perform most ColdFusion Administrator tasks programmatically. The Administrator API consists of a set of ColdFusion components (CFCs) that contain methods you call to perform Administrator tasks. For example, you use the setMSQL method of datasource.cfc to add a SQL Server data source.
The CFCs for the Administrator API are located in the cf_web_root/CFIDE/adminapi directory. Each CFC corresponds to an area of the ColdFusion Administrator, as the following table shows:
CFC |
Description |
|---|---|
accessmanager.cfc |
Specify the user name, password, description, access rights, sandboxes, and allowed roles for individual users. |
administrator.cfc |
Contains basic Administrator functionality, including login, logout, the Migration wizard, and the Setup wizard. You must call the login method before calling any other methods in the Administrator API. |
base.cfc |
Base object for all other Administrator API CFCs. |
| collection.cfc | Managa ColdFusion collections. Actions include reloading collections and enabling highlighting for collections. |
datasource.cfc |
Add, modify, and delete ColdFusion data sources. |
debugging.cfc |
Manage debug settings |
eventgateway.cfc |
Manage event gateways |
extensions.cfc |
Manage custom tags, mappings, CFXs, applets, CORBA, and web services. |
| flex.cfc (Removed in ColdFusion (2020 release)) | Manages Data Services integration settings (Removed in ColdFusion (2020 release)) |
office.cfc |
Manage OpenOffice settings. |
mail.cfc |
Manage ColdFusion mail settings. |
runtime.cfc |
Manage runtime settings for fonts, cache, charts, configuration, and other settings. |
| scheduler.cfc | Manages Scheduler tasks Services integration settings like finding task, updating task, and enabling cluster management. |
security.cfc |
Manage passwords, RDS, and sandbox security. |
serverinstance.cfc |
Start, stop, and restart Tomcat servers. This CFC only works for Developer and Enterprise editions only. |
servermonitoring.cfc |
Perform many of the Server Monitor tasks programmatically. |
The adminapi directory also contains an Application.cfm file and two subdirectories.
Note: If you are using sandbox security, enable access to the cf_web_root/CFIDE/ adminapi directory to use the Administrator API. |
Following are the styles of methods in the Administrator API:
- Method arguments When setting complex or varied values, the Administrator API uses method arguments.
- Getting and setting simple values When setting simple values, such as true or false debug settings, the Administrator API uses get and set property methods. To view the methods, method arguments, and documentation for the Administrator API CFCs, use the CFC Explorer. For example, to view datasource .cfc when running in the server configuration, open a browser to http://localhost:8500/CFIDE/adminapi/datasource.cfc.
Use the Administrator API
Instantiate administrator.cfc:
<cfscript>
// Login is always required.
adminObj = createObject("component","cfide.adminapi.administrator");
Note: You can instantiate administrator.cfc and call the login_ method in a single line of code, as the following example shows:_createObject("component","cfide.adminapi.administrator").login("admin");
Note: You can log in as a user other than administrator, but with proper permissions, as follows. Provide the user name after the password.
createObject("component","cfide.adminapi.administrator").login
("#password#","#username#")Call the administrator.cfc loginmethod, passing the ColdFusion Administrator password or the RDS password:
adminObj.login("admin");
Instantiate the desired CFC:
myObj = createObject("component","cfide.adminapi.debugging");
Call the desired CFC method (this example enables debugging):
myObj.setDebugProperty(propertyName="enableDebug", propertyValue="true");
Examples
The following example adds a SQL Server data source:
<cfscript>
// Login is always required. This example uses two lines of code.
adminObj = createObject("component","cfide.adminapi.administrator");
adminObj.login("admin");

// Instantiate the data source object.
myObj = createObject("component","cfide.adminapi.datasource");

// Create a DSN.
myObj.setMSSQL(driver="MSSQLServer",
name="northwind_MSSQL",
host = "xx.x.xxx.xx",
port = "1433",
database = "northwind",
username = "sa",
login_timeout = "29",
timeout = "23",
interval = 6,
buffer = "64000",
blob_buffer = "64000",
setStringParameterAsUnicode = "false",
description = "Northwind SQL Server",
pooling = true,
maxpooledstatements = 999,
enableMaxConnections = "true",
maxConnections = "299",
disable_clob = true,
disable_blob = true,
disable = false,
storedProc = true,
alter = false,
grant = true,
select = true,
update = true,
create = true,
delete = true,
drop = false,
revoke = false );
</cfscript>
The following example adds the same SQL Server data source, but uses the argumentCollection attribute to pass all method arguments in a structure:
<cfscript>
// Login is always required. This example uses a single line of code.
createObject("component","cfide.adminapi.administrator").login("admin");

// Instantiate the data source object.
myObj = createObject("component","cfide.adminapi.datasource");

// Required arguments for a data source.
stDSN = structNew();
stDSN.driver = "MSSQLServer";
stDSN.name="northwind_MSSQL";
stDSN.host = "xx.x.xxx.xx";
stDSN.port = "1433";
stDSN.database = "northwind";
stDSN.username = "sa";

// Optional and advanced arguments.
stDSN.login_timeout = "29";
stDSN.timeout = "23";
stDSN.interval = 6;
stDSN.buffer = "64000";
stDSN.blob_buffer = "64000";
stDSN.setStringParameterAsUnicode = "false";
stDSN.description = "Northwind SQL Server";
stDSN.pooling = true;
stDSN.maxpooledstatements = 999;
stDSN.enableMaxConnections = "true";
stDSN.maxConnections = "299";
stDSN.enable_clob = true;
stDSN.enable_blob = true;
stDSN.disable = false;
stDSN.storedProc = true;
stDSN.alter = false;
stDSN.grant = true;
stDSN.select = true;
stDSN.update = true;
stDSN.create = true;
stDSN.delete = true;
stDSN.drop = false;
stDSN.revoke = false;

//Create a DSN.
myObj.setMSSQL(argumentCollection=stDSN);
</cfscript>
<!--- Optionally dump the stDSN structure. --->
<!---
<cfoutput>
<cfdump var="#stDSN#">
</cfoutput>
--->