
- Adobe Connect User Guide
- Introduction
- Adobe Connect Meeting
- Start, attend, and manage Adobe Connect meetings and sessions
- Host and Presenter Area in Adobe Connect
- Adobe Connect application for desktop
- Adobe Connect pre-meeting diagnostic test
- Adobe Connect Central home page
- Share content during an Adobe Connect meeting
- Update and manage Adobe Connect meetings
- View meeting reports and analytics data
- Notes, chat, Q&A, polls, and quiz in Adobe Connect meeting
- Accessibility features in Adobe Connect
- Keyboard shortcuts in Adobe Connect
- Create virtual meeting rooms and arrange layouts
- Breakout rooms in Adobe Connect meetings
- Manage meeting attendees in Adobe Connect
- Start, attend, and manage Adobe Connect meetings and sessions
- Adobe Connect administration and maintenance
- Enabling Adobe Connect HTML client
- Enabling single sign-on in Adobe Connect
- Change the timeout period
- Configure audio providers for Universal Voice
- Create and import users and groups in Adobe Connect
- Enhance Adobe Connect account security
- Generate usage reports in Adobe Connect Central
- Administer and manage Adobe Connect accounts
- Manage users and groups
- Set permissions for library files and folders
- Back up user data, database, and settings of Adobe Connect server
- Build custom reports from Adobe Connect database
- Maintain disk space and clean cache on an Adobe Connect server
- Manage and monitor Adobe Connect server logs
- Start and stop Adobe Connect services
- Adobe Connect Events
- Adobe Connect Training and Seminars
- About Adobe Connect courses and curriculum for training
- Conduct trainings with Adobe Connect
- Create and manage seminars
- Create training courses in Adobe Connect
- Create and manage training curriculum in Adobe Connect
- About Virtual Classrooms in Adobe Connect
- Adobe Connect reports to monitor training features
- Participate in Adobe Connect training sessions and meetings
- Closed captioning in Adobe Connect
- Audio and video conferencing in Adobe Connect
- Manage user content in Adobe Connect
Adobe Connect is about to get faster, smarter, and younger with the upcoming Adobe Connect 12 upgrade, scheduled for Spring, 2022.
With this new upgrade, Adobe Connect’s legacy, the Flash-based Classic View will reach its end-of-life. Customers will no longer be able to host or join Adobe Connect sessions using the Classic View.
If you haven’t transitioned your Flash-based content and rooms to the HTML-based Standard View, then now would be the right time , ahead of Adobe Connect 12 release.
For more information, see Adobe Connect Classic View End of Life (EOL).
Get all information about Adobe Connect meeting recordings. Learn how to make the recordings and transcript offline, edit, manage recording and transcript files, and access the HTML player for them.
A host can record a meeting or training session. When played back, the recording shows exactly what the attendees saw and heard. All pods and interactions in a meeting room are recorded, except for the Presenter Only area and breakout rooms. You can start and stop recording at any time, to control what content gets recorded. A host can create a reference archive of meetings and make the recordings available to attendees.
- Tips to record a meeting
- Record a meeting
- Stop recording
- Edit meeting recording
- Edit recording transcript
- Offline recordings in Standard view
- Closed captions
- Restart recording
- Convert and download recordings
- Playback recorded meeting
- HTML viewer for recordings
- Navigate to specific events in recordings
- Managing recorded meetings
When recording a meeting, consider the following:
- If you use VoIP and the Video Pod to broadcast audio to meeting attendees, all audio is recorded automatically.
- If you use the Universal Voice solution, you record the audio with the meeting. All telephone-based audio is recorded, and can be played back with the audio conference. The audio heard through computer speakers during an Adobe Connect session is played back. If the audio broadcasting was stopped during the session, users on a telephone can continue to talk and listen to each other, but they are not heard through computer speakers.
- If you do not use Universal Voice, you can use your speakerphone and your computer microphone as recording devices. All audio input to your computer is captured and recorded but is not broadcast to participants. (Because audio is not directly integrated with the meeting in this case, the quality can be lower than using a direct method.)
- If you use an integrated telephony adaptor, begin your recording from within Adobe Connect, not from a telephone key command.
- The meeting recording is assigned a URL and added to the Recordings page associated with the meeting room in Adobe Connect Central. To play a recording, you need an Internet connection, the recording URL, and permission to view it.
- Adobe Connect administrators can change recording settings to adhere to standards for governance. These settings affect how meetings and training sessions are recorded and what is recorded. For more information, see Working with compliance and control settings.
Start recording a meeting
-
If you have associated a universal voice audio profile with the meeting, choose Audio > Join Audio Conference.
-
Choose Meeting > Record Session.
-
In the Record Session dialog box, enter a Recording name and summary for the meeting recording.
Note:While recording a meeting, if your audio is disabled, enable it by selecting the Turn On Audio Conference option. Or, continue without audio by clicking the Record Without Audio button.
A recording icon
 appears in the menu bar to indicate that the meeting is being recorded.
You can pause an ongoing recording. Anything you do in the live meeting during the time you pause the recording is not recorded.
If a problem occurs during the recording, an error message appears in the upper-right corner of the window. You can try to reconnect to the conference audio, record the meeting without audio, or stop recording the meeting.
-
From the Meeting menu, click Stop Recording.
The meeting recording is saved and is available for playback at any time.
Add a reminder to record the session
You can use this feature to initiate a reminder to hosts to record a session.
-
Choose Meeting > Preferences > General.
-
Select the checkbox to "Remind me to start recording the session."
-
Click Done.
This feature is enabled only when force recording is turned off.
After recording a meeting or training session, you can use the built-in editor to remove sections of the recording. The editor is useful if the recording contains periods of silence or unnecessary information. Following are some tips for editing recordings:
To edit a meeting or virtual classroom recording in the Content library, you must have Manage or higher permissions for the recording. If you created the meeting or virtual classroom, you have these rights by default.
To edit a recording under Meeting > Recordings or Training > Recordings, you must have Host permissions. You can create an index using time tags to enable participants to easily view and navigate through the recording. You can also edit/delete the existing auto-generated time tags.
In addition, you can also create sections within a recording using chapter markers. You can hide the names of participants interacting over chat and retain the content of these interactions.
The link to your recording does not change after editing. Users given the link and rights to access the recording see the most recent version saved, including any edits that were made.
Multiple users can open a recording in edit mode at the same time. However, after one user saves their changes, others editing at the same time receive an error when they try to save their changes.
In addition, you can also hide Chat Pod, Attendee Pod, or Q&A Pod, or a combination of these pods. To protect the privacy of individuals, you can also hide the names of the attendees in standard view meeting rooms.

Adobe Connect administrators can change recording settings to adhere to standards for governance. These settings affect how meetings and training sessions are recorded and what is recorded. For more information, see Working with compliance and control settings.
Edit a recorded meeting
Editing a recording is useful if the recording contains sections of silence or unnecessary information that you want to remove before making the recording available.
For Standard view meeting rooms
-
From the Adobe Connect Central home page, click Meetings or Training, and then click the meeting or classroom that includes the recording.
-
Click Recordings.
-
Click Edit Recording in the Actions pop-up menu, next to the recording that you want to edit.
Note:HTML enables editing the recording in browser as well as in application mode.
-
Simply click the Play button to search for places that require editing or drag the progress marker to a specific location.
Controls to edit meeting recordings. A. Event Index Show/Hide B. Rewind 15 seconds C. Pause D. Forward 15 seconds E. Selection markers F. Cut G. Undo cut H. Volume control
Controls to edit meeting recordings. Use Tab key to navigate through all the buttons in the recording editor.
-
Use the selection markers to specify the areas of the recording you want to remove, and click Cut.
-
(Optional) At the left of the meeting window, click A to show the Events Index pane, where you can Navigate to specific events in recordings.
-
(Optional) To remove changes, click Undo to remove individual edits made you last saved to restore the recording to its original state.
-
Remove any additional sections. When you have finished, click Save.

Add bookmarks to the recording
Bookmarks can be added to the recordings to call attention to a certain point for future viewers to identify places that they can easily return to.
-
Click on the Add Bookmark from the options on the far left hand side.
Add bookmark Add bookmark -
Select the Add Bookmark icon from this menu. Once you click the bookmark icon, you are prompted to set a timestamp and name of your bookmark. You can also add some notes, if required.
Add timestamp Add timestamp -
Click Done. The bookmark now appears in the recording at the specified timestamp.


View, Edit or Delete recordings
In addition to viewing, editing or deleting the bookmarks, you can also add chapters in the recordings. Chapters can be added at any point along the recording timeline bar for the existing bookmarks. Chapters allow you to highlight changes at places within the recording that can be referred for discussions.
-
In the panel at the left corner, the bookmarks for all recordings are seen with timestamps. Click a bookmark to open a recording right to bookmarked time.
A. Add Chapter B. Edit recording C. Delete recording
-
To add a chapter name, click on Add Chapter. The chapter is added above the selected bookmark.
-
To edit the name of the bookmark, hover over the bookmark and click Edit (
 ). The Edit Bookmark dialog box opens.
-
You can permanently remove a bookmark if you no longer need it. In the bookmarked tab, hover over the bookmark and click Delete (
 ).
).

The CEF based application has only the option of persistent index pane in the recording playback in the edit recoding mode. Overlay index pane is not available for CEF-based application unlike Flash-based applications.
Adobe Connect administrators can change recording settings to adhere to standards for governance. These settings affect how meetings and training sessions are recorded and what is recorded. For more information, see Working with compliance and control settings.
-
From the Adobe Connect Central home page, click Meetings or Training, and then click the meeting or classroom that includes the recording.
-
Click Recordings.
-
Click Edit Recording in the Actions drop-down menu.
-
Simply click the Play button to search for places that require editing or drag the progress marker to a specific location.
-
(Optional) To go back to original state, click on Revert to original icon on top.
-
Remove any additional sections. When you have finished, click Save edits.
Editing a recording's transcript aids in improving accuracy, rectifying mistakes, and enhancing readability of transcripts. Transcripts are generated by Automatic speech recognition (ASR), which can have errors due to background noise, accents, and technical limitations. The transcript editor in the recording editor will help in rectifying these errors.
- Transcript Editor is still in the Beta version of Adobe Connect 12.6 version.
- A transcript should be available with the recording. Currently, recordings will also be transcribed if ASR is enabled from preferences when the recording starts.
- For 12.6, we need to ensure that the checkbox "Show transcript viewer (Beta)" is checked from the edit recording information page for each recording to access the transcript editor in the recording editor.
-
From the Adobe Connect Central home page, click Meetings or Training, and then click the meeting or classroom that includes the recording.
-
Click Recordings.
-
Click Edit Recording in the Actions pop-up menu, next to the recording that you want to edit.
-
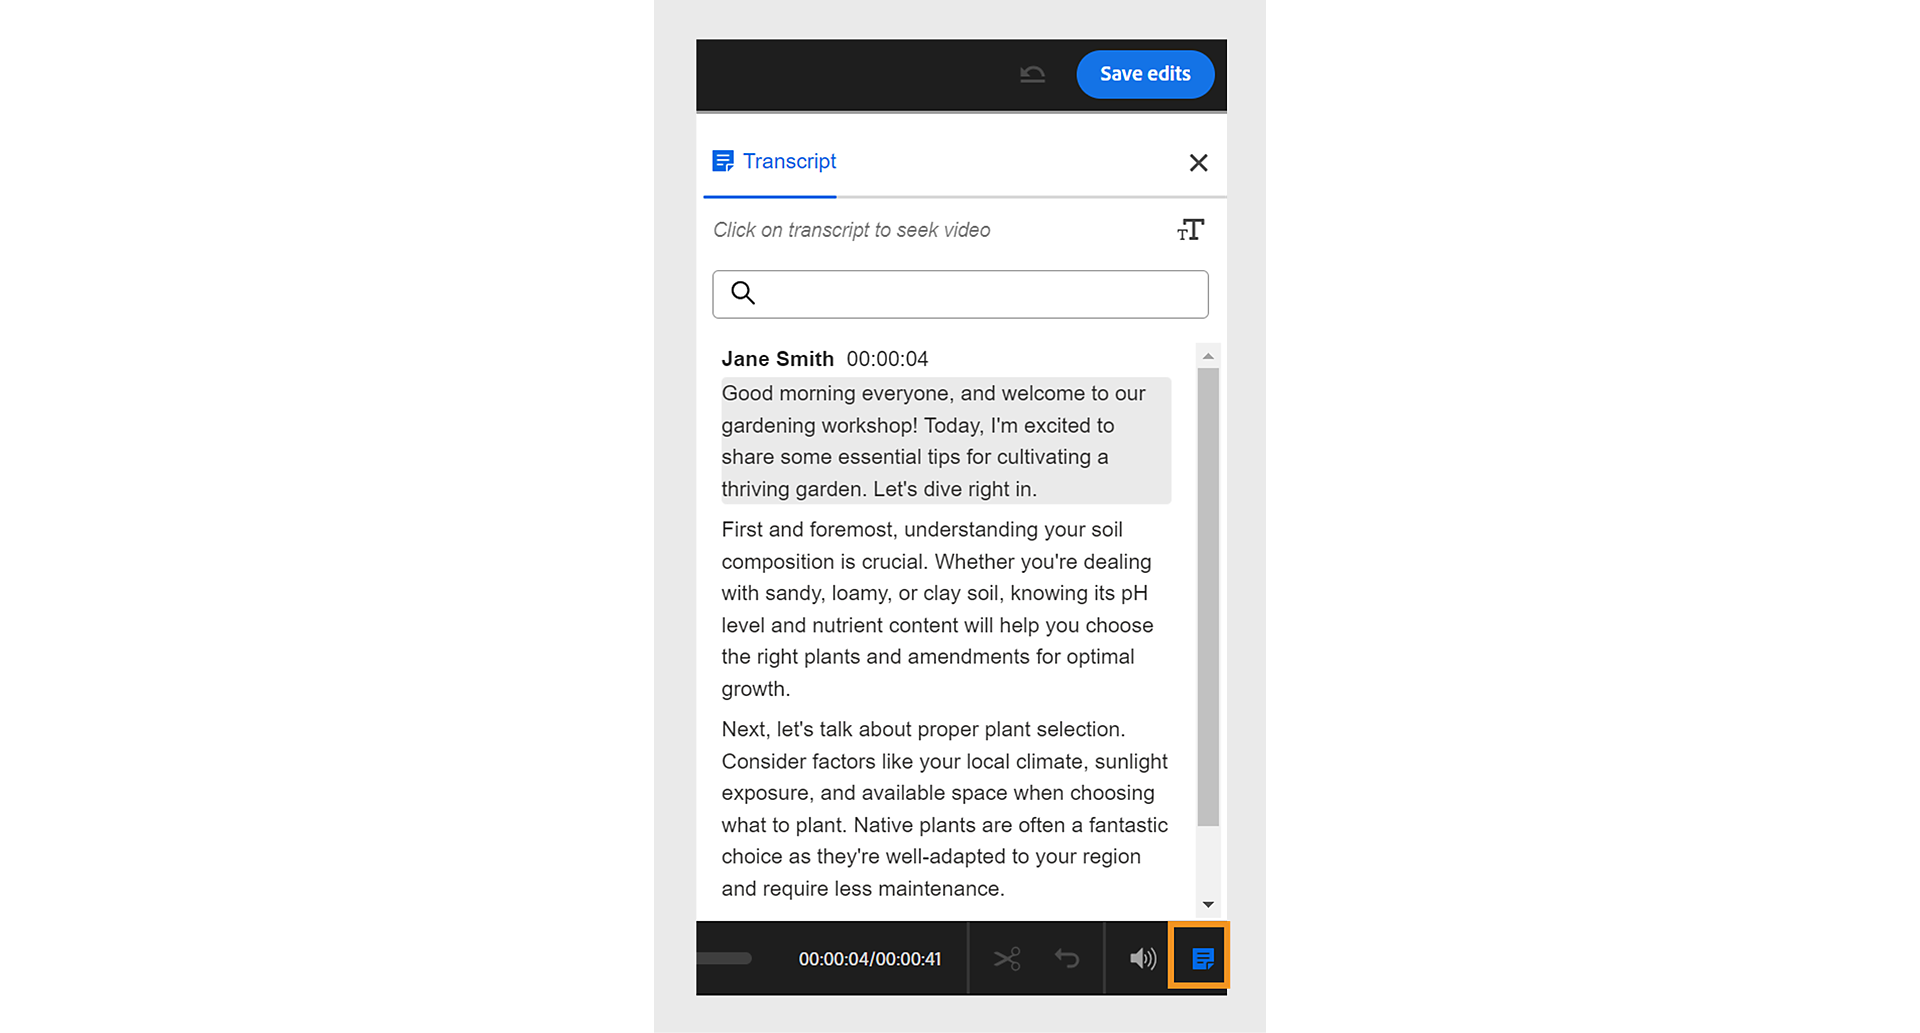
Select Transcript, which is present at the lower right of the screen.
It opens the transcript of the recording. -
Double-click on the text you want to edit.
It opens in a text editor. Make the required changes.Click on resizer to resize the text.
-
Click on to save the changes in text editor.
-
(Optional) To revert any modifications, select Undo to eliminate specific edits made during your last save and return the transcript to its initial state.
-
Click Save edits.


Adobe recommends
Offline recordings in Standard view
In Adobe Connect Classic View, you could convert and download an Adobe Connect session recording offline, in MP4 or FLV format. The conversion happens using the Adobe Connect application for desktop.
From Connect 11.3, you can convert a meeting into MP4, and download recordings in the Standard view.
Start recording
To download an Adobe Connect meeting for offline viewing, follow the steps below:
-
- In the recording viewer window, click the gear icon in the lower-right corner to access the settings panel ,
- Hide in playback allows you to enable/disable the following options:
- Attendee Names: By choosing this option names will appear anonymous, so instead of real names, they will be replaced by ‘User1’, ‘User2’, etc. in all the pods where names appear (Video, Chat, Q&A, Attendee, and Share.
- Chat Pod: Display or hide the Chat pod in the recording.
- Attendee pod: Display or hide the Attendee pod in the recording.
- Q&A pod: Display or hide the Q&A pod in the recording.
- Video Quality: These presets are provided to allow you to easily select combinations of resolution and frame rates for different target outcomes. However, each parameter can be adjusted individually to create a custom profile.
- Resolution: Choose the resolution (720p, 1080p, etc.) for the resulting recording.
- Bandwidth: Choose the recording bandwidth from the drop-down list. The recording will dynamically adjust the video parameters, such as video compression, to attempt to stay below this value.
- Quality: This value affects the compression of the video frames, sometimes making the video slightly smaller or larger.
- Profile: These provide different levels of video compression. Baseline is the lowest compression but the best playback compatibility.
- Frames per sec: Frames Per Second (FPS) is a measure of the number of video frames that are displayed per second.
- On Windows only you can enable the option Record silently, if you want the recording to continue in the muted mode. The result will contain the audio, but the audio will be stripped of during creation of the mp4 file. Enable the option Set as default, if you want to keep these settings for the next time you make a recording offline.


Adobe Connect Recording Offline Utility
Adobe Connect provides a utility program to convert a single or multiple recordings into mp4. The conversion is done in a batch.
Note: Ensure that the Adobe Connect application must be installed.
This is a Windows-only utility.
To run the utility, perform the steps below:
-
Download the utility from the site and unzip the contents.


Closed Captions
If your meeting included closed captioning during the live meeting, then those captions will, by default, be included or ‘burned-in’ to the resulting video file. You can adjust the text size, colors, and placement of the captions once you start the recording, or you can turn off the captions to prevent them from showing in the video file.
A dialog box pops up when the conversion has finished and provides the details of the actual recording. The actual quality and resolution of the generated MP4 file depends on your system resources and may be equal to or lower than the chosen settings.
Stop recording
When you stop recording midway, the MP4 that is saved contains the recording up to the point when it was stopped. This is useful when you want only a portion of the meeting to be recorded.
Restart recording
In the Restart recording dialog, you can either save the current recording or discard it, and then restart the recording.
Known issues/limitations
- On macOS, when recording, we recommend that users do not switch between applications.
- On macOS, you cannot record a meeting on muted mode.
You can convert and download an Adobe Connect session recording offline, in MP4 or FLV format. This conversion happens on your local system using the Adobe Connect application for desktop.
- Recordings converted to mp4 will be created in Classic view (not the Standard view).
- The offline recording does not contain audio, if any, from the shared HTML content. HTML5 content created using Adobe Captivate 9 and Adobe Presenter 11 is supported in Virtual Classrooms and its recordings.
-
Log in to Adobe Connect Central and locate the recording that you want to convert to MP4 format.
-
Against the recording, click Actions to open the pop-up menu and click Make Offline. The recording is opened in the Adobe Connect application along with a pop-up dialog.
-
In the Offline Recording dialog, select MP4 or FLV as an output option. Also, select the quality using either the slider or by customizing the settings of the output by selecting Advanced Options.
Dialog bog to set conversion options to create an offline recording. Dialog bog to set conversion options to create an offline recording. -
Optionally, to save the Advanced Options as the default, click the check box Set as default.
Note:The set as default option is client-specific that means on a specific machine a user can continue to use set defaults. On a different machine, the system default (HD quality) remains.
-
Click Proceed with Offline Recording. Browse and save the file in a local folder. The recording will play in the Adobe Connect application and get converted to MP4 or FLV file. A dialog box pops up when the conversion has finished and provides the details of the actual recording. The actual quality and resolution of the generated MP4 file depends on your system resources and may be equal to or lower than the chosen settings. Check the pop-up dialog box at the end for the Resolution and the FPS achieved.
Summary of the actual quality of the offline file created from a recording. Summary of the actual quality of the offline file created from a recording.


A host or presenter makes the recording URL available so attendees can play the recording. Every recording is automatically assigned a unique URL and is stored on the Recordings tab for the meeting room in Adobe Connect Central.
When you play a recording, a recording navigation bar appears in a space below the meeting room. For optimal performance, a high-speed Internet connection is recommended for recording playback.

A. Pause/Play toggle button B. Progress marker C. Elapsed/total time
Adobe recommends
You control who has access to the recording:
Any user invited to the meeting using the invitees or enrollee tabs in Adobe Connect Central can view the recording if given the recording URL.
Hosts can view information, such as permissions, if they have rights to browse to the Adobe Connect Central folder where the recording is stored.
Anyone with Internet access can view the recording if you make it public. Alternatively, you can move the recording to the Content library and set specific user permissions (moving the recording to the Content library is irreversible.)
Adobe Connect administrators can change pod, sharing, and other settings to adhere to standards for governance. These settings affect the layout of meeting rooms and what you can do in meeting rooms. For more information, see Working with compliance and control settings.
Play a recording from Adobe Connect Central (hosts and presenters)
-
From the Adobe Connect Central home page, click Meetings or Training, and then click the meeting or classroom that includes the recording.
-
Click the Recordings option.
-
Click the name of the recording.
-
Do one of the following:
To view the last edited version of the recording, click the URL For Viewing.
To view the full, original, unedited version of the recording, click View Original.
You either view the original version of the recording or the latest edited version; multiple edited versions of the recording are not saved. (If the recording was never edited, the URL For Viewing is the same as View Original.)
Play a recording from a URL (for attendees)
Hosts and Presenters typically share a recording with the attendees by sending an email containing the URL of the recording.
-
Click the recording URL that the presenter sent to you.
The recording opens in your browser and is ready for playback. If you are unable to open the recording, check if you have the permission to access the recording.
- Audio with Opus codec will not play back in the classic view. You cannot create an MP4 for Opus codec-enabled meeting.
- When creating offline recordings, the recordings will be in the classic view, not the standard view.
With Adobe Connect 10.6, users can now watch HTML versions of Adobe Connect recordings in a web browser on most platforms without the need to use a Flash player or other plug-ins and try a new 'beta' HTML viewer for mobile browsers. Existing recordings created with Adobe Connect 9 or higher shall also be available through the HTML viewer. Apart from the HTML viewer, users can also choose to watch the recordings in a classic view through the Adobe Connect desktop application.
The new HTML viewer for recordings is only available if the HTML client has been enabled for the meeting room where the recording took place, or if the recording has been moved to the content library.
Any non-hybrid custom pods or non-hybrid content (i.e. SWF, FLV, Presenter, Captivate, etc...) present in the recordings will not be visible in the HTML viewer. To view this content, users should switch to the classic view.
For each meeting recording, a new indexed event is created for every chat message, layout change, slide change, and camera start or stop. Each event is listed in an Events Index, along with a timestamp. You can filter and browse the index to quickly navigate to specific events.
-
At the left of the window for the recorded meeting, click the triangle to show the Events Index pane.
Events Index pane; Click the highlighted control to show and hide the pane. Events Index pane; Click the highlighted control to show and hide the pane. -
Do either of the following:
Click the Filter pop-up menu to select specific events to view. You can show all events, a single event, event types, or any combination of events that can be indexed. Events that can be filtered include layout changes, chat messages, slide changes, and users joining or leaving the Attendees or Video pod.
Search for specific events: type keywords into the search box and click Find. All events that contain a match appear highlighted. You can look for names of meeting participants, text in all Notes pods, text in all Chat pods, and text on meeting slides.

You can view all recordings made for a particular meeting, change permissions, rename, or move a recording, or view a content report for a recording. Also, a recorded meeting can be used as content for another meeting. (If a recording has been edited, edits are preserved if the recording is moved to the Content library.)
Adobe Connect administrators can change pod, sharing, and other settings to adhere to standards for governance. These settings affect the layout of meeting rooms and what you can do in meeting rooms. For more information, see Working with compliance and control settings.
View a list of recorded meetings
You can access all the recordings owned by you, directly in Home > My Recordings tab. You can sort the list of recordings, search for recordings, or launch a recording. Use a minimum of three characters in the search field to search through the recording names. For more information, see Adobe Connect Central home page.
If you are an administrator or have Manage permissions for a meeting folder, you can view the recordings that have been created from a meeting room.
-
Click the Meetings tab at the top of the Adobe Connect Central home page.
-
If there is more than one meeting folder, navigate to the folder that contains the meeting.
-
Click the meeting name in the list.
-
In the Meeting Information page, click the Recordings link on the navigation bar.
Access recordings from the Recordings tab after accessing a meeting in Adobe Connect Central. Access recordings from the Recordings tab after accessing a meeting in Adobe Connect Central. Note:Depending on your license and your permissions, all the tabs displayed in the top row in Adobe Connect Central may not be visible.

Move recordings to the Content library
An administrator or a user with permissions to manage a specific Meetings library folder can move meeting recordings from the folder to the Content library.
Moving a meeting recording to the Content library is useful if you want to give access to people other than the original invitees.
To make a recording available to anyone in the world that is given the recording URL, see Play back a recorded meeting.
-
Click the Meetings tab at the top of the Adobe Connect Central home page.
-
Navigate to the meeting that has recordings you want to move.
-
Click the meeting name in the list.
-
In the Meeting Information page, click the Recordings link on the navigation bar.
-
Select the check box to the left of any recording that you want to move.
-
Click Move To Folder on the navigation bar.
-
Navigate to the folder in the Content library where you want to move the recording. (As you navigate, the new destination appears in the upper right of the Adobe Connect Central window.)
-
Click Move.
Recordings when moved to content library can be tracked under the Reports for Number of Views and detailed Time In and Time Out of registered users.
Edit recording information
-
From the Adobe Connect Central home page, click Meetings or Training. Then click the meeting or classroom that includes the recording.
-
Click the Recordings option.
-
Click the name of the recording.
-
In the Recording Information bar, click Edit.
-
Revise the title, summary, and language as desired.
-
To update any items linked to the recording with the revised information, select Update Information For Any Items Linked To This Item.
Delete a meeting recording
Only an administrator or a user with permissions to manage that specific Meetings library folder can delete a meeting recording.
If you delete a meeting room, you can retain the associated meeting recordings. You are prompted to move all the recordings to your My Content section. You can choose to not move the recordings and delete them along with the meeting room.

-
Click the Meetings tab at the top of the Adobe Connect Central home page.
-
Navigate to the meeting that has recordings you want to delete.
-
Click the meeting name in the list.
-
In the Meeting Information page, click the Recordings link on the navigation bar.
-
On the Recordings page, select the check box to the left of any recording you want to delete.
-
Click Delete above the list.
-
Click Delete on the confirmation page.